Pages

Monday, July 24, 2017

No Bake Cheese Cake Recipe: One Of Our Favorites


Yesterday was Mr. In The Mid-west's birthday! He requested this no bake cheese cake for his birthday.


This cheese cake is easy and delicious! It requires no baking, and therefore, no unnecessary heating of the house in the summer, always a plus. :)

No Bake Cheese Cake

Graham Cracker Crust: (Optional: I often make a shortbread crust instead of graham cracker. Both are good.)
1 1/2 cups Graham Cracker Crumbs
2 TBS. Sugar
6 TBS. Butter, melted

Filling:
1 - 8 oz. pkg. Cream Cheese, softened
1/2 cup Granulated Sugar
1 cup Sour Cream
2 tsp. Vanilla Favoring
8 oz. Whipped Cream (cool whip will work.)

Combine cracker crumbs, 2 TBS. sugar, and butter to make the graham cracker crust.  Press into the bottom of a 8×8 inch baking dish. This crust tastes better if it is toasted in a 350° F. oven for 15 minutes, but if you don't want to run your oven, it still tastes good without baking.

To make the filling, cream softened cream cheese and sugar until light and combined. Add sour cream and vanilla flavoring, mix well.

Whip cream until soft peaks form. Fold whipped cream into cream cheese mixture.

Pour into prepared crust. Chill in refrigerator for a minimum of 4 hours, preferably over night.

Serve with your choice of toppings.
Enjoy!

Friday, July 21, 2017

Sleeping Dogs Pigs In A Blanket Recipe


I saw this idea on a cooking video. Making these Sleeping Dog Pigs in A Blanket was a fun project.


My Sleeping Dogs were not nearly as cute as the lady's in the video. Some of the heads got pretty lopsided, and the faces were challenging to draw.


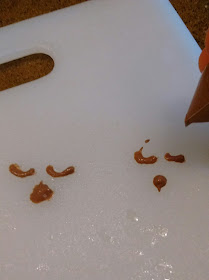
I made a few practice faces on the cutting board. The angle of the heads made it difficult to "draw" the faces on, not to mention, they were piping hot, straight out of the oven.


More important than the looks was the taste. Mr. In The Mid-west said the bread on these Pigs In A Blanket was excellent! He really liked it. :)


To make the Sleeping Dog shape, I took the portion of dough and divided it into two pieces. The smaller piece was about 1/3 of the portion of dough.


I rolled the larger piece out big enough to fit a half of a hot dog onto.


I pinched the long edges together.


 At one end of the hot dog I folded the dough under.


At the other end I pinched the open to seal it shut. The I used scissors to snip the flap into what would be the dog's front legs.


To make the dog's head I formed the small piece of dough into a flattened circle.


I used scissors to cut the ears away from the face.


I pinched the corners of the face together to make a rounded chin.


I used the egg wash to attach the dog's head to the body. I think this was a mistake. The egg wash made the area very slippery. I think the heads would have had a better connection without the egg wash.


Before going into the oven the whole surface of the dough got an egg wash. This made them turn out nicely browned and glossy.


To make the "paint" for the faces I mixed together a small amount of flour and cocoa powder with a tiny amount of water. I didn't have a recipe for this part, so I had to improvise.


Here is the recipe:

Sleeping Dogs Pigs In A Blanket


1 pound of hotdogs (8 hotdogs) cut in half

4 1/2 tsp. Yeast
3/4 cup Warm Water
1/3 cup Sugar
1 tsp. Salt
2 eggs
1/2 cup Butter, room temperature
4 cups All-purpose Flour

Egg Wash:
1 Egg, beaten
2 TBS. Water

Face Paint:
Flour
Cocoa powder
Water

To make the bread dough, dissolve the yeast in the warm water. Stir in the sugar, salt, 2 eggs, butter, and 2 cups of flour. Beat until smooth. Mix in remaining flour until smooth. Knead dough until elastic and gluten is developed. Cover and let rise in a warm place for 1 1/2 hours.

Punch down dough. Divide into 16 even pieces. Shape each piece around the hot dog halves as described above to make sleeping dog shapes.

Place on a greased baking sheet. Brush with egg wash. Bake in preheated oven at 400° F. for 10 minutes. 

Remove from oven. Quickly pipe on faces with cocoa powder/flour/water paste.

Return to oven for 1 minute.

Remove from oven cool slightly. Serve warm with ketchup (if desired).


Wednesday, July 19, 2017

Wednesday Hodgepodge #314


1. Growing up, were you close to your grandparents? Tell us one or two specific things you remember about them.

I have memories of my maternal grandparents and my paternal grandmother, as well as, a few great-grandparents. 
I have the most memories of my paternal grandmother because she lived the closest. I remember fishing with her, going to spend the night at her house, and cutting fire wood with her and my Dad, just to name a few memories. I remember weekends when my family and my Uncle's family would all go to Grandma's house. We would order pizza from the local Casey's General Store and Grandma would make her "famous" salad. I got to be the taste tester for Grandma's Salad dressing quiet often. I would always say it needed to be more sour. "The sourer the better!" I love my Grandma's Salad. She chopped iceberg lettuce and tossed in black olives and Parmesan cheese. For the dressing she mixed lemon juice and salad oil. She put the seasoning straight on the salad. She uses a generous amount of celery salt and garlic salt. I still love Grandma's Salad. I need to make some. :)

2. What's an item you were attached to as a child? What happened to it?

I don't remember having a particular item that I was attached to growing up. The non-person things that I spent the most time playing with were our swing set, my bicycle, and my favorite climbing tree. My siblings were what I was most attached to growing up. We were best friends and had such good times together. We still have a great time when we get together! :)

3. When you look out your window, do you see the forest or the trees (literally and figuratively)? Explain.

The trees, literally and figuratively. We live in a neighborhood and there are no forests near by. As far as figuratively goes, it is easy to think about the things that pertain to today and tomorrow, but looking at the big picture doesn't happen as often.

4. Do you like sour candies? Which of the 'sour' foods listed below would you say is your favorite?

grapefruit, Greek yogurt, tart cherries, lemons, limes, sauerkraut, buttermilk, or kumquats 

Have you ever eaten a kumquat? What's your favorite dish containing one of the sour foods on the list?

This is a long question!
I do like sour candies.
I like grapefruit, Greek yogurt, tart cherries, lemons, limes, and sauerkraut. My favorite is lemon.
I have never eaten a kumquat.
I like all of these sour foods plain, for the most part. I would like some lemon juice on a salad rightnow. :)

5. July 1st marked the mid point of 2017. In fifteen words or less, tell us how it's going so far.

Half a year over,
Cold will come soon.
Why did you remind me?

6. Insert your own random thought here.

I really enjoyed thinking about my memories of my Grandparents. I think it would be a good project for me to write down more of these memories. It would probably be something to pass on to my children.


Friday, July 14, 2017

Embroidered Hair Band


I made this hair band as a birthday gift for my sister. Her birthday is actually today, so, "Happy 6th Birthday!" to her. :)

(Picture used with permission.)

Isn't she so cute! She has such lovely curly hair, but, she gets really frustrated by it being in her way. I thought maybe the hair band would help her a little.


I did some modeling with it just to get pictures. And, I did take LOTS of pictures!


I would like to make a few more of these hair bands in the future. I made this design up as I went, so the pictures will help me replicate it someday.


I have been wearing more hair accessories lately. I style my hair very plainly. Almost every single day of my life I put hair in a bun, and that is all I do.


I put my hair in a bun every day because it is easy, convenient, and protects my hair, and, since I want to be able to sell it for a high price I want it to stay in good condition.


I have found adding accessories to my plain style has been a fun way to express some of my personality. I think I would use an embroidered piece like this pretty frequently.


The design was inspired by Mexican and Hungarian styles of embroidery (what a combination! Right?). I did several searches on Pinterest that gave me some good ideas.


The flowers are comprised mostly from satin stitch with a backstitch boarder. I used 3 strands of floss for the satin stitch as well as the backstitch.


The stems between the larger flowers is a stem stitch using 3 strands of floss while the smaller stems are backstitching using 2 stands of floss. The leaves are some type of herring bone stitch, I believe. I did a blanket stitch detail around some of the leaves using just 1 strand if thread.


I used an unbleached linen to make the band from. I liked the end product, but it would be easier to embroider finer details with a more tightly woven fabric.


After I stitched the design I sewed the back on by putting the right sides together, adding a layer between the front and back to act as interfacing, stitching with a 1/4" seam allowance down the long edges, and then turning it right side out.


I decided to make the tie straps from the linen, as opposed to using a ribbon, because the linen would offer more grip and be more likely to stay tied.

The overall length is slightly over 30 inches. I think it is a good length. It was not hard to tie on nor was there a lot of excess.


When I finish assembling the band I did a boarder stitch through all the layers to add visual completeness as well as to keep the casing from rolling.


Wednesday, July 12, 2017

Favorite Picture Book: Goody O'Grumpity


This picture book is one of our favorites. Boy In The Mid-west brings it to me quite often, and I almost have it memorized. ;) The rhyming words give clues to what is going on, but the pictures are where the real story is told. The artwork is exquisite, and well researched.

This story is set in colonial America. The day to day life of the eighteenth century is portrayed through the illustrations. Goody O'Grumpity is up early, even before the story starts (in the cover page illustrations), stiring her pot over the open hearth. She has to tend the fire. Milk the cow. Churn the butter. Collect the eggs. Prepare her cake, (which, true to eighteenth century cooking resembles a yeast bread more than anything we consider "cake" today.) All the while, the sing-song words to the story barely touch  on these tasks, and focus more on describing the sights and sounds.

When she takes the cake to bake in the oven, you can see another aspect of colonial cooking. The oven is an earthenware structure, built on on elevated surface, and protected from rain by a slanting roof. To cook in an oven like this you have to start a fire inside the oven and let it burn for a few hours. When the oven is thoroughly heated, the coals and ashes are removed from the oven, and the, un-baked, baked goods are added. The oven would stay hot for hours, and the whole village would do all of their baking on one day in the community oven or ovens.

As the cake bakes the aroma fills the country side. The pictures take us through the settlement. We observe that is fall. The tree leaves are changing color. Families are harvesting pumpkins. A man is catching a trout from the river. A fine lady sits and stitches on a tapestry. We get a glimpse into the neighboring Indian village. The story ends with all (of the many) children getting a slice of Goody's freshly baked cake.

At the end of the book is a recipe for Goody O'Grumpity's Cake, which is good because my mouth is watering by the end of the story. I hope to try it someday. Maybe it will make it into a future blog post. ;)


When Goody O'Grumpity Baked A Cake

By Carol Ryrie Brink

When Goody O'Grumpity baked a cake
The tall reeds danced by the mournful lake,
The pigs came nuzling out of their pens,
The dogs run sniffing  and so did the hens,
And the children flocked by dozens and tens.
They came from the north, the east and the south.
With wishful eyes and watering mouth,
And stood in a crowd about Goody's door,
Their muddy feet on her sanded floor.
And what's do you s'pose they came to do!
Why, to lick the dish when Goody was through!
And throughout the land went such a smell
Of citron and spice - no words can tell
How cinnamon bark and lemon rind,
And round, brown nutmeg grated fine
A wonderful haunting perfume wove,
Together with allspice, ginger and  clove,
When Goody but opened the door of her stove.
The children moved close in a narrowing ring,
They were hungry - as hungry as bears in the spring;
They said not a word, just breathed in the spice
And at last when the cake was all golden and nice,
Goody took a great knife and cut each a slice.


Monday, July 10, 2017

Nasturtiums: Beautiful And Tasty!


I am so happy to have nasturtiums growing in my garden this year!


This my first experience with growing nasturtiums. They have not taken any special care. I just water them and weed them.


Nasturtium blossoms and leaves are edible. They can be cooked or eaten raw. I add the flower petals to salads.


They have a peppery flavor that I really didn't expect. They add bold color, as well as, bold flavor to salads.


Have you ever grown nasturtiums?
Have you ever eaten nasturtiums?
Do you know of any recipes that call for nasturtiums?

Let me know in the comments section!


Friday, July 7, 2017

Orange Creamsicle Recipe


During the summer heat a frozen treat is always appreciated! Here is a recipe for some popsicles I made last week.


Orange Creamsicles

1 3oz. box of orange flavored gelatin powder
2 TBS. sugar
1 cup boiling water
3 cups cold milk
1 1/2 tsp. vanilla flavoring


Combine the flavored gelatin and sugar in a 4 cup measuring cup or medium size bowl.
Add boiling water and stir for 30 seconds or until sugar and gelatin are completely dissolved. Add the cold milk and vanilla flavoring. Stir to combine.


Pour the mixture into popsicle molds. If you don't have popsicle molds paper or plastic Dixie cups lined up on a baking sheet work great. I only have this one mold and I don't have any Dixie cups. What I did was freeze the popsicles in batches. When these were solid I removed them from the mold and then poured the next batch. I just kept the popsicle solution in the refrigerator in between batches.


Freeze the popsicles for 45 minutes and then insert a wooden popsicle stick or plastic spoon (or fork). Replace in the freezer and freeze until solid.
Enjoy!

Wednesday, July 5, 2017

First Zucchini and Summer Squash From the Garden 2017


These are the first squash to be picked from our garden this year!


I only have one zucchini plant and one yellow summer squash plant. Some years I have zucchini coming out of my ears, and I can't give it away fast enough! :)


I don't think I will have that problem this year. I am looking forward to eating squash through the summer. 

Monday, July 3, 2017

Humor: Dandelion Greens At The Grocery Store!

We stopped in a high-end, yuppie type, grocery store last month. It was a neat place. Everything was very artisanal and very expressive.

We managed to get out of there without spending an arm and a leg. The only things we purchased were a banana and a ginger root.

I noticed that they carried dandelion greens in their produce section, and had to take a picture! I told Mr. In The Mid-west, "See, they are really edible! I am not crazy for serving weeds!" Okay, that doesn't prove that I am not crazy, but at least I am not the only one eating dandelions. :) (Mr. In The Mid-west has always had a healthy amount of scepticism about the weeds that I eat.)


Check out the price, $3.99 per pound! And they are certified "organic." I think I should consider becoming a dandelion farmer. It seems like quite the cash crop! 😊

Saturday, July 1, 2017

My New Tea Pot, I Couldn't Pass It Up!


We went garage sale-ing on a Saturday this past month. (6/3/17). I found this tea pot for $2. I didn't have any tea pots up to this point. I just thought I didn't need a tea pot. I brew my tea in a mug. Tea pots were just clutter in my opinion.


...But, this tea pot was so charming! I like the simple blue and white design in the glaze. The wire handle has character. The lid is so cute. The opaque glass windows seem very delicate, and allow light to pass through the tea pot.


I decided if I was going to buy this tea pot then I would have to actually make use of it. I would not let it become clutter.


The very next day, Sunday, I set up a "tea" meal. I dug my cookie press out of the cabinet and made some fancy Butter Cookies. (I was glad to utilize my new oven! I probably would have made a small batch of less fancy cookies if I was still using my toaster oven.😊)

I made some tea sandwiches by using a cookie cutter to make heart shaped slices of bread. I had to be a little creative with the filling. I had no deli meat or sliced cheese. I did have some shredded cheddar cheese and some tomatoes, though. I made a cheese spread with shredded cheddar, cream cheese, a little mayonnaise, fresh dill weed, fresh green onions, and a little salt. It turned out to be very similar to a cheese ball in look and consistency. I spread the cheese mixture onto each slice of bread and put tomatoes slices in the middle.


The next week my sister came for a visit. I showed her my new tea pot and shared with her my enthusiasm. The tea pot is the perfect size for brewing a couple tea cups worth of tea at once. As I said, I usually brew my tea straight in the mug. There are a few down sides to this method that a didn't fully realize until I had a tea pot.

Number 1. I have to use a large mug to get the most out of my tea bag. I don't think tea bags steeped twice yeild enough flavor, but if you brew the tea bag in a large enough amount of water the first time it gives enough flavor to the whole batch, and makes the most out of each tea bag. The tea pot does this job much better than picking out an extra large mug.

Number 2. I like to brew my tea, covered, for a minimum of 15 minutes, especially when I am drinking tea for medical benefits. To do this in a mug I have to set a plate on top. I need it to be covered in order to keep the heat in and, also, to keep to much water from evaporating. You'd be surprised that you can actually notice a difference in the water level between tea that was covered while brewing and tea that wasn't. A tea pot has a lid and solves both of these problems.

Number 3. It takes tea a long time to cool to a comfortable drinking temperature when it is in a large mug. The quantity of hot water just doesn't cool off very quickly. And, once it does get down to a comfortable drinking temperature you have to guzzel it rapidly before it becomes too cool to be enjoyable. The tea pot is the perfect solution. After the 15 minutes of brewing you can pour a small cup of tea. The small cup cools quickly. In such a small quantity you are able to drink it all before it gets too cold. The tea in the tea pot, on the other hand, stays hot for quite some time because of the lid and quantity of hot liquid. I can enjoy small tea cup-full, after small tea cup-full over the course of an hour or so, all at the perfect temperature for drinking.

Yes, I have turned my tea sipping into a science.😊


After my sister went home (she lives a few hours drive from us) she found some tea cups that matched my little tea pot almost perfectly! They were listed on a garage sale site. She bought them and gave them to me as a gift!


The tea cups have a marking on the bottom, which my tea pot does not. The cups are, also, hand painted and the design on the tea pot is printed. These cups are probably more special than the tea pot, but only because they are probably more valuable, but because they are a gift from my sister. 😊 The tea pot is probably a cheap reproduction.


The tea cups do have in common with the tea pot these opaque see through-ish pieces of glass. Isn't that so neat!

Epilogue:

Sadly, I did break my tea pot. 😢 I am not sure exactly how it happened. I was moving my tea pot to the other counter space in order to get it out of BMW's reach. I don't know whether I knocked it against the counter or if it just slipped out of my hands. The next thing I knew it was shattered into pieces on the title flooring. I did shed a tear. 😢 I am glad I had made up my mind to make practical use of the tea pot. In that case, at least, I did get to enjoy my tea pot while I had it. I brewed tea in it a handful of times before the tragedy.


I have since employed my coffee press to brew tea. I can still enjoy the tea cups, and reap the benefits of the tea being able to cool off quickly in the smaller vessels.