Pages

Thursday, July 28, 2022

Zucchini Pizza Crust Recipe


For those who have zucchini coming out of their ears this time of year, I am sharing this Zucchini Pizza Crust Recipe.

Zucchini Pizza Crust

8 cups Shredded Zucchini

1 tsp. Salt

1 cup Shredded Cheese

2/3 cups Flour

2 Cloves Garlic, Minced

3 tsp. Oregano

1 tsp. Basil

2 Eggs, Beaten

1/2 tsp. Salt


Toss zucchini with 1 tsp. salt in a large bowl. Let stand 15 minutes. Transfer zucchini to a cloth, gather up the corners of the cloth, and squeeze out excess water from the zucchini.

Replace the drained zucchini back into the bowl. Mix in the remaining ingredients. 

Spread out on an oiled baking sheet.

Bake at 550° F. for 8 minutes.

Remove crust from oven. Add toppings. 

Bake an additional 4 minutes.


I have tried one other zucchini pizza crust recipe. This recipe was my favorite. The best things about this recipe are the draining the water out of the zucchini step and the amount of zucchini it uses up.

The crust is not too soggy and it holds together as a slice of pizza. And it's healthy! Win, win, win!


Thursday, July 21, 2022

Sweet Zucchini Relish And Dill Cucumber Relish

In this post are my recipes for sweet and dill relish. 
These relishes play an integral role in my chicken salad, tuna salad, egg salad, and potato salad. 

The Confetti Zucchini Relish won the first place ribbon every year for as long as I can remember at the county fair where I grew up in Putnam County Indiana. The lady who made it didn't mind sharing the recipe and neither do I. :)

Confetti Zucchini Relish
10 cups chopped or grated zucchini (you can use the food processor)
4 cups copped onion
5 Tablespoons salt
1 sweet red pepper, chopped
1 green pepper, chopped
3 cups sugar
2 Tablespoons cornstarch
3 teaspoons turmeric
2 teaspoons dry mustard
2 teaspoons celery seed
1/2 teaspoon pepper
2 1/2 cups cider vinegar

Combine zucchini, onion, and salt; let stand overnight in refrigerator. Rinse and drain well. Place in large kettle or dutch oven along with remaining ingredients. Cook 10-12 minutes until mixture thickens, stirring constantly. Do not over cook. Pack hot into hot sterilized jars, leaving 1/2 inch head space. Process for 10 minutes in boiling water. Yields: 5 pints

Last time I made this recipe I used 1/2 of the sugar and was pleased with the results. I am not sure if it was a safe thing for me to do. I didn't think of the preserving quality of the sugar, at the time. I didn't have any problems, though, and I was happy I did have to use as much sugar as the recipe calls for.   


Dill Cucumber Relish

8 lbs. Pickling Cucumbers
1/2 cup Pickling Salt or Non Iodized Salt
2 tsp. Tumeric
4 cups Water
2 1/2 cups Finely Chopped Onion
1/3 cups Sugar
2 TBS. Dill Seed
4 cups Vinegar

In food processor, working in batches, finely chop the cucumbers. Transfer batches to a large glass or stainless steel bowl. Sprinkle with pickling salt and tumeric. Add water, cover and let sit at room temperature for 2 hours.

Transfer cucumber mash to a colander and rinse and drain thoroughly. Using hands, squeeze out excess liquid.

Prepare canner, jars and lids. In a large stainless steel pot; combine drained cucumbers, onions, sugar, dill seed and vinegar. Bring to a boil over medium-high heat. Reduce heat and boil gently, stirring occasionally, until slightly thickened and the vegetables are heated through, about 10 minutes
Ladle hot relish into hot jars, leaving 1/2 inch headspace. Remove air bubbles. Wipe rims. Screw bands to fingertip-tight. Process in water bath 15 minutes. Yields about 8 pints.

Tuesday, July 12, 2022

Another Peasant Dress With Measurements


This is not a tutorial. You'll have to see Farmhouse On Boone for that. 
This is just the measurements for a size 3 T and some minor changes I made to the pattern.


Size 3T

Skirt - 13" long by 20" wide, cut 2

Bodice - 8" long by 13" wide, cut 2

Sleeves - 7" long by 11" wide, cut 2

Ruffle - 4 1/2" long by 72" wide, cut 1

Ties - 4" × 36", cut 2

Under-Skirt - 17 1/2" long by 46" wide, cut 1

3/8" woven elastic - 18" long for neck and 2 pieces 8 1/2" long for the sleeves 
The way I assembled the dress is pretty much the same as the Farmhouse On Boone pattern directs.
I sewed the bodice and the sleeves together as directed with the exception of my choice of embellishments. I used mini rickrack on the bodice and mini rickrack and lace on the sleeves.

For the ruffle:
I used a single piece of fabric sewed into a loop for the ruffle in stead of 2 pieces of fabric.

For the underskirt I, also, used a single piece of fabric sewed into a loop placing the seam in the center back.

The underskirt is a little more gathered than the top skirt. So, I sewed a gathering stitch at the top of the underskirt and then pulled up the gathering stitching to match the size of the over skirt. Then I stitched the over skirt and the underskirt together with a gathering stitch.

I deviated from the pattern with the way that I did the ties, too. I made two ties and sewed them onto the dress at the side seams. To make the ties I folded the tie pieces in half and sewed down one short end and the open long edge. Then I turned it right side out and pressed it flat with an iron.
Honestly, the ties are a little long. I would take around 6" off the length next time.

The shape that I used the make the arm holes looks like this: (I am sorry, this probably doesn't make any sense unless you've already seen Farmhouse On Boone's video or blog post. She explains everything)

I used topstitching at the waist and the area above the gather of the ruffle to give those areas a more finished look and more structural integrity.
If you need to make a 3T size dress, I hope these measurements can help you!

Tuesday, July 5, 2022

Petticoat Slips For Freedom Of Movement


I made these petticoat slips for my daughter recently.
Most dresses that are her size are too short to keep her little underpants covered during normal two year old play. They fit her in the shoulder area, but it would be helpful if they were a few inches longer at the hem side.
These petticoats give her coverage and allow her to move freely while doing so.

I used very light weight cotton fabric for this project. It will be breathable and comfortable.

I finished the edges on the tank top portion with a bias tape. I have very little practice at applying bias tape. You can see that it didn't turn out perfectly, but that is okay.
I am happy that I chose to use a fun hot pink colored bias tape. 
I cut long strips of fabric on the bias to use for hem tape. I had to lay my cutting operation out on the living room floor because I don't have any tables or counters big enough for the job.
I had planned on using a wide hem lining, but I ran into a problem of gapping.
 I should have known better. The skirt is tapered making the hem a greater distance around than the skirt is a few inches higher than the hem. The piece of fabric that I had cut on the bias to make my hem tape was just a straight piece of fabric. It was not possible for it to make that curve without having excess fabric on the top edge. 
I had to trim the hem tape down significantly.
The main reason that I had wanted a wide hem lining was to add stability to the area where I planned to sew lace onto the skirt.


The lace turned out fine without out the lining. 
You can see that I ran out of identical lace for the top row of lace on the cream colored petticoat. I did have some lace that was the same color, although, the pattern didn't match. It totally works. It seems pretty easy to blend different types of lace together. Most people won't notice and, if they happen to, it's not an eye sore.
The skirts are complete full circles. 
A full circle skirt gives a girl an incredible amount of freedom! She can stretch her legs to the fullest degree; high kicks, splits, tree climbing, playground activities, horseback riding, cartwheels, and more are all possible in a full circle skirt. Pretty much the only thing that can't be done modestly is a headstand. 

The petticoat drapes nicely and looks pretty sticking out underneath a dress that is too short.
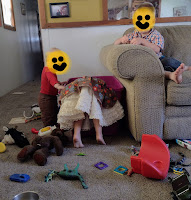
My daughter couldn't wait for me to help her with trying it on, so she put it on all by herself......over her dress. :) Hey, it's cute that way, too!

You can see the petticoat at work
in this picture I quickly snapped
 while she was digging toys out of the box.