Showing posts with label Just for fun. Show all posts

Wednesday, October 14, 2026

Fun Owl Snack


I made these owl snacks for recess on Friday last week.

Ingredients:

Sliced Banana 

Sliced Apple

Frozen Blueberries 

Slivered Carrot

Peanut Butter 

Bread


Spread peanut butter on the bread to make the owl body.

Use peanut butter to glue the apple wings, banana with blueberry eyes, and the carrot beak onto the bread.
Serve to children and enjoy the smiles!
You could also toast the bread or use Nutella as variations on this basic idea.

Tuesday, January 6, 2026

Gingerbread Houses 2026


We held a gingerbread house decorating party on New Year's Eve this year. This is the second year we made gingerbread houses on New Year's Eve.

 This year it was a big party with many cousins. I baked enough gingerbread house pieces for every child and adult to have their own house.
We had so much fun!
I made a short video to show all the houses and creativity displayed this year.
Happy New Year everyone! The grace of God be with you, in you, and around you in 2026!


Tuesday, January 7, 2025

Gingerbread Recipe For Gingerbread House Making


Last year I bought a gingerbread house cookie cutter set. The recipe on the back of the package worked well. I used the same recipe this time. 

I made a triple batch and it was the perfect amount. We made 5 houses and had a few spare parts. If we hadn't needed our spare parts we could've made 6 houses.

Gingerbread Triple Batch

1 1/2 cups Butter, room temperature  
1 cup Sugar 
1 cup Molasses
1 TBS. Ground Cinnamon
1 TBS. Ground Ginger
1 TBS. Baking Soda
3 Egg Yolks
1 TBS. Vanilla Flavoring 
3/4 Salt
6 cups Flour

Place sugar, molasses, cinnamon, and ginger in large sauce pot over medium low heat. Bring to a boil, stirring frequently. 
Remove from heat. 
Stir in baking soda. 
Stir in butter one tablespoon at a time, sitting well after each addition. (Room temperature butter is really helpful for this step.)
Add egg yolks, vanilla, and salt, stirring to combine.
Add flour, a cupful at a time, stirring to combine. 
Turn dough out onto a lightly floured surface and knead until dough comes together and is no longer sticky, adding flour a tablespoon at a time if necessary. 
Place dough in refrigerator for 2 hours or until thoroughly chilled. 
Divide dough into 6 sections. Working with one section at a time, roll out each section to 1/8 inch thickness. Cut out cookie and house pieces. Place on cookie sheet. 
Bake at 325°F. for 12-18 minutes or until edges are lightly brown. 
Remove from oven. 
Cool on cooling racks. 
Once cool assemble with royal icing.

Royal Icing (AKA Construction Glue)

3 Egg Whites
3 1/2 - 4 cups Powdered Sugar 
Beat with whisk to form thick icing. Spoon into plastic bags. Snip a small hole in the corner of each plastic bag to make a piping bag.


Tuesday, January 23, 2024

Gingerbread Houses!

I had so much fun making these gingerbread houses with the children!
My siblings and I had fun doing these when I was young. My mother would wait until after Christmas and buy the gingerbread house kits on clearance. 
We would split into teams and work together. The first few years we split the teams into boys vs. girls. Everything was a competition with us. Now my family is so large that they have to get several gingerbread houses and split into teams of 4-5 people. I live too far away to join these current games.

This year I wanted my children to experience the fun. I went looking for gingerbread house kits after Christmas. I found kits but they weren't cheap enough for "tightwad-me." I bought gingerbread house cookie cutters that were on clearance instead. We made our own gingerbread from scratch.

I had never made gingerbread before. I followed the recipe on the back of the cookie cutter package. The recipe worked out very well. I will copy the recipe to my blog later for safe keeping.

I found a recipe for the Royal icing that we needed for glue. It was really easy to make. Just egg whites and powdered sugar. It dries rock hard and worked perfectly as gingerbread house construction adhesive.
We assembled all the pieces and began decorating. This step was so fun!
It was fun for me to watch my children make their own designs. They are so creative! Each child is their own person with their own personality and ideas. It is special to see them make their own choices. These are some of the really rewarding moments of being a mom.


We need to do this every year! 


Wednesday, January 10, 2024

Tiny Cakes


I made tiny versions of these recipes to go with the tiny cake pans that my daughter got for her birthday.
The cake pans are so cute! There are even two tiny spring-form cheese cake pans.
I divided some regular cake recipes down several times to make them the right size for these pans.
We made a Lemon Cake, a Chocolate Cake, two Cheese Cakes, and three heart shaped Carrot Cakes. Here are our recipes:


Lemon Fiesta Cake

1 TBS. Butter, Softened
2 1/2 TBS. Sugar
1 TBS. Egg
1/4 tsp. Lemon Zest
4 drops Lemon Extract 
1/4 cup Flour
Pinch Salt
Pinch Baking Soda
1/8 tsp. scant Baking Powder
1 1/2 TBS. Buttermilk

Glaze:
1 1/2 tsp. Sugar
1 1/2 tsp. Butter
1/2 tsp. Water
1/2 tsp. Lemon Juice 

Beat together the butter and sugar. Add the egg, lemon zest, and lemon extract.

In a separate bowl combine dry ingredients: flour, salt, baking powder, baking soda.

Alternately, add the dry ingredients and the buttermilk to the butter mixture.

Scrape batter into a greased tiny Bundt cake pan.
Bake at 325° F. for 20-25 minutes. While cake is baking make the glaze by melting together the glaze ingredients.
Remove cake from oven. Cool for 5 minutes. Turn cake out of pan. 
Poke holes all over the cake. Pour over the glaze while it is still warm.


My Mother's Chocolate Cake

1 TBS. Cocoa
2 1/2 TBS. Butter, Melted
1 1/2 TBS. Boiling Water
1 TBS. scant Egg
1 TBS. + 2 tsp. Sugar
1/4 tsp. Vanilla Flavoring
1/4 cup Flour
1/4 tsp. Baking Powder
1/4 tsp. Baking Soda
1/8 tsp. Salt
1 1/2 TBS. Hot Coffee or Hot Water

In a small bowl combine cocoa, butter, and boiling water.

In another small bowl combine the dry ingredients: flour, baking powder, baking soda, and salt.

Beat egg, sugar, and vanilla. Add cocoa mixture and blend. Add flour mixture and blend. Add the hot coffee last and blend.

Pour into greased tiny Bundt cake pan. Bake at 350°F. for 20 minutes.


Paisley Print Cheese Cake

1 pkg. (8oz.) Cream Cheese, softened
1/4 c. Sugar
2 TBS. + 2 tsp. Sour Cream
1 tsp. (Scant) Vanilla Flavoring
1 TBS. Flour
1 Egg
1 TBS. + 1 tsp. Cocoa Powder
1 tsp. Butter, melted
2-3tsp. Hot Water 
1 TBS. Sugar
1/8 tsp. Vanilla Flavoring

Prepare two tiny graham cracker crusts.

Beat together the cream cheese, sour cream, and vanilla. Add the flour and egg. 
Bloom the cocoa by mixing the cocoa powder, butter and hot water.
Take out 1/2 cup of cheese cake batter and combine it with the cocoa mixture remaining sugar and vanilla.
Into the prepared pans dollop the cheese cake batter, alternating between the chocolate and vanilla batters. Use a skewer to swirl the colors into paisley patterns.
Bake 4 minutes @ 450° F. Reduce oven temperature to 250° F. For 15 minutes.

Graham Cracker Crust
1/2 c. graham cracker crumbs
1 TBS. sugar
2 TBS. melted butter

Mix and press onto the bottom of two tiny spring-form pans and 1/4" up the sides.
Bake 8-10 minutes at 350°F.


Carrot Cake

1 small carrot finely grated
1/2 cup flour
1/4 tsp. baking soda
1/4 tsp. baking powder
1/4 tsp. cinnamon
pinch of ginger
dust cloves
1/8 tsp. salt
2 TBS. egg
2 1/2 TBS. oil
3 1/2 TBS. sugar
2 TBS. buttermilk
1/2 tsp. vanilla flavoring

Sift together the dry ingredients. 
Mix the wet ingredients.
Combine both mixtures.
Add carrot.
Divide between three tiny heart pans that have been greased.
Bake at 350° F. for 20-25 minutes.

Frost with cream cheese frosting once the cakes have cooled.


Monday, July 24, 2023

Corn Dog Recipe!


This recipe is from some friends of mine who I came to know as a teenager. My family threw an annual county fair themed party when I was young. My family and many of our friends were heavily involved in the local 4-H county fair. After the fair had concluded my parents held a party for our friends that we called The Survival Of The Fair Party. The food that we made for the party was all the fair foods that we were too cheap to buy during the actual fair. I don't blame my parents for not buying us children fair food. There were 8 of us at the time and it would have cost them an arm and a leg to feed us all at fair prices. I can only remember eating an elephant ear from the fair one time and we had to split it up between us all.

That doesn't mean we were deprived, though. Mom could make us dozens of elephant ears at home for the price of one fair-priced-elephant-ear, and she did!
During the Survival Of The Fair Party we feasted on corn dogs, pork tenderloin sandwiches, Philly steak and sausage sandwiches, perogies, lemon shake ups, funnel cakes, and elephant ears! Everything was delicious! 

This is the corn dog recipe that we used.
One of our friends gave us this recipe to use for the Survival Of The Fair Party so this recipe bears their name. 

Whitesell's Corn Dog Recipe 
1 egg
1/2 c. milk
1 c. Bisquick (or into a 1 c. measurer add 2 t. baking powder, 2 t. sugar, 1/2 t. salt then fill the measuring cup the rest of the way with flour.)
2 TBS. cornmeal
1/2 t. dry mustard
1/4 t. paprika
1/8 t. pepper
3 TBS. sugar
1 lb. hot dogs
Mix the batter ingredients together.
Pat the hot dogs dry with a towel or paper towel.
Pour the batter into a tall glass or drinking cup. Using wooden skewers dip the hot dogs into the batter.
Deep fry at 375° F. until golden brown.

For mini corn dog bites:
Cut the dried off hot dogs into 1/4ers.
Using a fork dip each hotdog piece into the batter and then slide it off of the fork into the hot oil. Fry until golden brown. Drain on paper towel before serving.


Monday, July 17, 2023

Yarn Dolls


My children and I had fun with this craft recently.

I got the idea from a website called The Craft Train: LINK

We made a whole bunch of yarn dolls. 

We made girl dolls and boy dolls. 

We made mama dolls and papa dolls. 

We made tiny baby dolls. 

We made tall dolls and short dolls and skinny dolls and thick dolls. 

We made whole families! 


This activity kept us busy for hours! Then we had fun staging photos with our yarn dolls.


Here's how you can make your own yarn dolls:

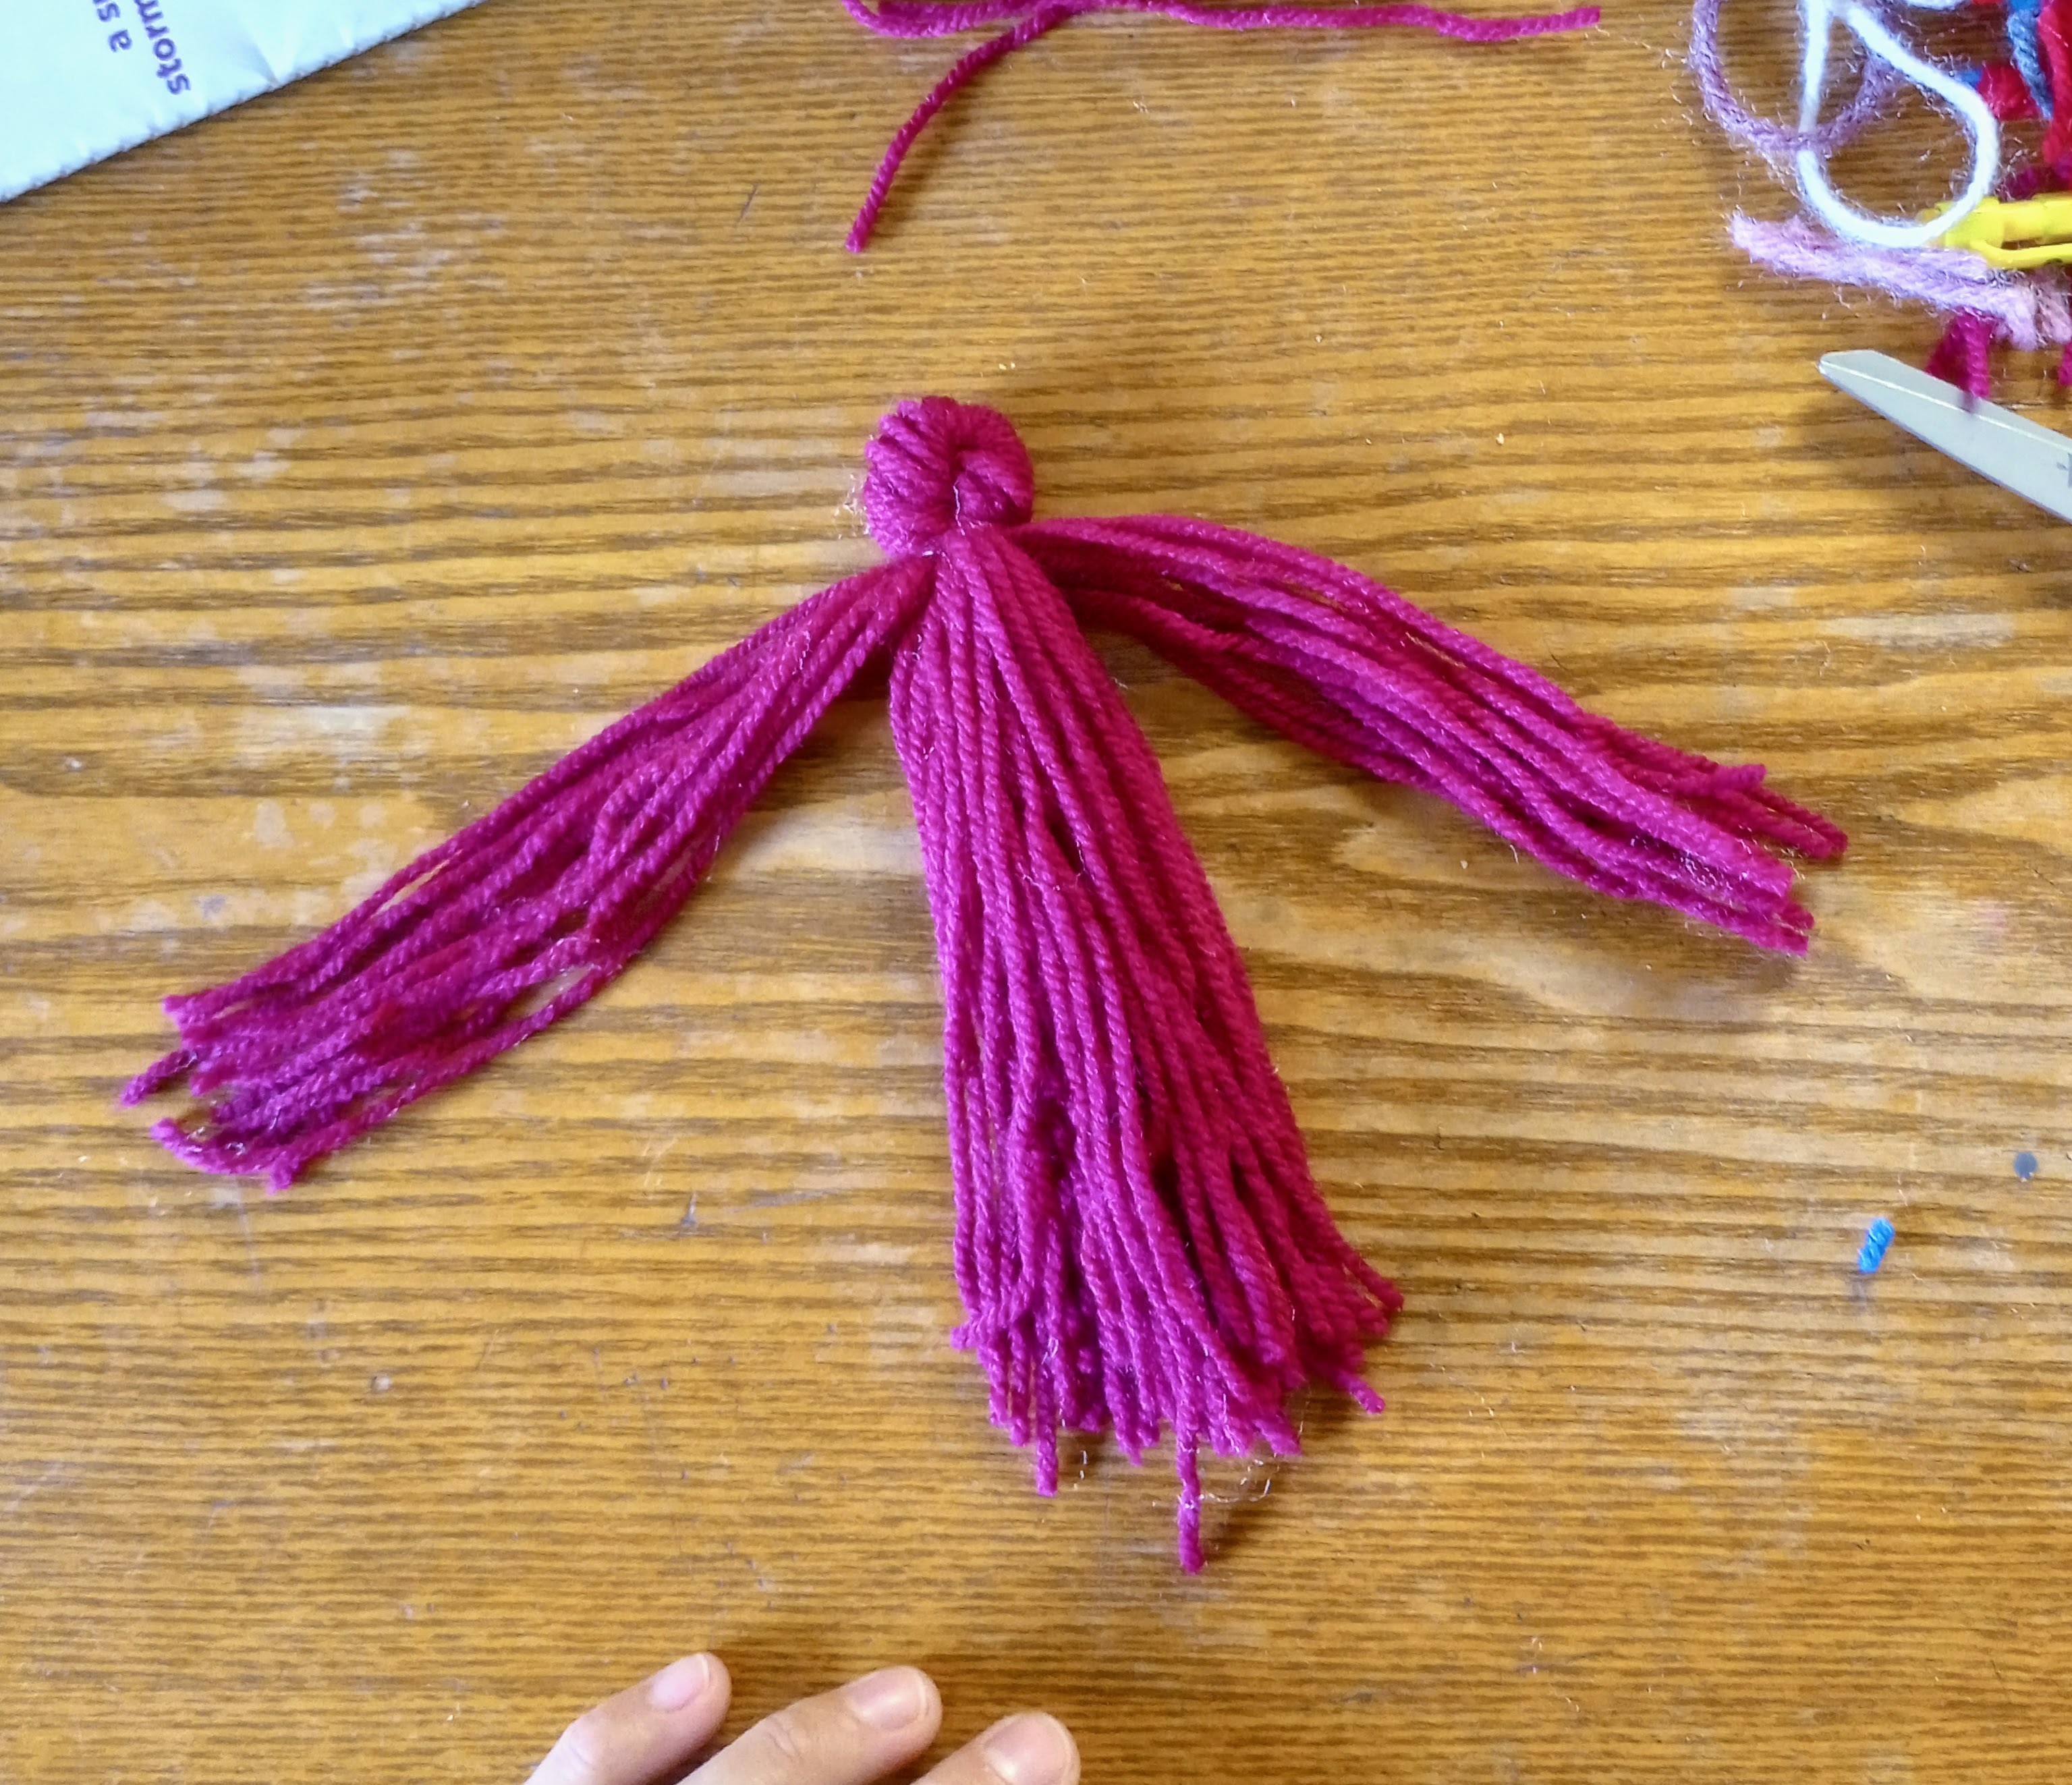
Wrap yarn around a book or stiff piece of cardboard. The taller the board the taller your doll will be. Wrap yarn until you have the desired thickness. 
You will have created a loop of yarn.
Cut the loop at one end. Now you will have a bundle of yarn string all the same length.
Twist the bundle at the center and bend it in half at the twist. This is called a bite. Use another piece of yarn to tie the bite in place, forming the dolls head.

Separate the tassel into three portions; two for the arms and 1 for the body.
Braid the arms, tie the ends with extra yarn, and trim them to the right length. The tighter the braid the more it will hold it's shape when maneuvered.
Use extra strands of yarn to tie around the body, making a waist and hips.
Trim the ends to even up the skirt and give it a finished look.
If you are making a boy doll divide the skirt into two legs, and braid the legs, tying off with extra lengths of yarn.

I hope you have as much fun with this project as we did!


Monday, June 12, 2023

Cheddar Biscuit Recipe


My daughter is my main helper today. 

We are going to make Cheddar Garlic Biscuits together.

Step 1. is to shred the cheese. We want 4 cups of cheese loosely packed. We are making a double batch.

Next we stir together the flour, baking powder, and salt.

After the dry ingredients are blended, we shred the cold butter. We add the butter fragments and the shredded cheese to the dry ingredients.

We use our hands to toss the cheese and butter throughout the floury mixture.
We stir in 2 1/2 cups of milk for our large batch. 
The dough is gooey. These are drop biscuits. No rolling pin required.
 I like to shape the biscuits with a large ice cream scoop.

I brush garlic butter over the biscuits before they go into the oven and again when they come out of the oven.

Garlic Cheddar Biscuits

2c. Flour
1 TBS. Baking Powder
1 tsp. Salt
1/4 c. Butter, cold (1/2 stick)
2 cups loosely packed Cheddar Cheese
1 1/4 c. Milk
1/4c. Butter, melted
1/2 tsp. Garlic powder or freshly crushed garlic cloves (2-3)
1/2 tsp. Dried Parsley

Mix together the flour, baking powder, and salt.

Cut in the cold butter. You can use a pastry cutter or use this trick I learned from my sister. She uses a cheese grater to shred cold butter into her biscuits dough.

Stir in the cheese.

Add the milk and stir until evenly moist.
Drop by spoonful onto greased baking sheet.

Add garlic and parsley to the melted butter.

Brush the biscuits with garlic herb butter. 
Bake 450°F. 15 minutes 

Remove from oven and brush again with garlic butter.
Enjoy!


Monday, April 17, 2023

Starting Sourdough!


I am so excited to start sourdough again. It has been many years since I let my sourdough starter die. I am looking forward to using a starter for bread baking again! It is so much fun!

For anyone who is curious about how to start a sourdough starter, this is the method I used.
Equal parts of flour and water are mixed together. It is important to use water the doesn't have any chlorine in it.
I am going to find some rye flour to feed the starter. In the past I have always been much happier with the activity and flavor from a rye flour starter. I looked for rye flour when I was out shopping at Walmart, but they don't carry rye flour at my Walmart. Isn't that just like Walmart? Their selection is so poor.
It the mean time I am using whole wheat flour.
Leave the mixture at room temperature with a permeable lid like a coffee filter or cheese cloth.

Everyday the equal parts flour and water have to be equivalent to the aged flour and water mixture.
Example: The aged flour and water mixture is equal to a 1/4 cup. Add a 1/4 cup flour and a 1/4 cup water. 
Everyday the mixture will double in size. I started with only 1 tsp. of flour and water so that my mixture wouldn't get out of had too quickly, doubling every day.
When my mixture reached 1 cup in volume I dumped out 3/4 of it to reduce the size. I had to do this about every other day. I did not throw this discarded portion away. I mixed it into pancake batter or bread dough.
This mark shows the starter right after feeding.

After two weeks of feeding I was begining to see a good amount of activity in my starter. You can see by the marks on the jar how much it rose after 8 hours and then 10 hours. The peak rise happened at 10 hours and then it began to deflate.


This mark shows how much it grew in 8 hours.
I am pretty excited with this amount of growth. I have been using my starter to make my Multi grain Sourdough bread and it rises superbly! I am so happy with my starter. Everyone in my family likes this bread. It makes good sandwiches; peanut butter and jelly, grilled cheese, and lunch meat. The sour flavor is not over powering with this recipe.

My starter peaked at 10 hours.
 It nearly doubled in size from the wild yeast!

I have enjoyed the process of starting a sourdough starter from scratch. It took about 3 weeks for my starter to fully develop enough yeast to rise bread really well. If you've ever wanted to try doing this yourself I hope I have encouraged you to go ahead and try! It is not anything to be intimidated by and it can be a lot of fun!