Thursday, June 29, 2017

Favorite Picture Book: Petunia


Petunia by Roger Duooisin is one of mine and BMW's favorite picture books. BMW can't quite say, "Petunia." When he wants me to read this book he brings it to me saying, "Tuna, Tuna." 😊

This is a cute story about a goose, Petunia, who finds a book in the meadow. Upon this discovery, she remembers having heard that, "He who owns books and loves them is wise."

Petunia wants be wise so that the barn yard animals won't call her a silly goose any more. She takes the book. She sleeps with it, she swims with it, she takes it every where she goes.


Having spent so much time with the book she thinks she must be getting very wise. This "wisdom" makes her puffed up with pride. Her neck stretches out several notches.

Now as touching things offered unto idols, we know that we all have knowledge. Knowledge puffeth up, but charity edifieth.
1 Corinthians 8:1 KJV

The other barnyard animals notice the change in Petunia. Since she carries around a book all of the time they think she must be wise and they begin to ask her for advice. Petunia is always glad to "help."

Her "advice" is quite ludicrous, and even young children will laugh at her solutions. She tells King, the rooster, that his comb is red because it is made from red plastic and the farmer probably stuck it on to tell him apart from the hens. When Straw, the horse, complains of a tooth ache Petunia inspects the situation. "Why! Look at all these teeth! No wonder you have a tooth ache! Let me get some pliers...."

Pride goeth before destruction, and an haughty spirit before a fall.
Proverbs 16:18 KJV

Eventually, her "wisdom" leads to a grave disaster. Many of the farm animals get hurt. Petunia's pride is deflated. She realizes that if she is really going to be wise she needs to learn how to read what is written in the book.

She says, "Now I understand. It is not enough to carry wisdom under my wing. I must put it in my mind and in my heart."

Therefore shall ye lay up these my words in your heart and in your soul, and bind them for a sign upon your hand, that they may be as frontlets between your eyes. 
Deuteronomy 11:18 KJV

I love this picture book! The characters are all charming. I like to give them all different voices to go with their personalities. The other great thing about this story is that several spiritual lessons can be pointed out. Many verses popped into my mind the first time I read this story.

This book was copyrighted in 1950 by Alfred A. Knopf, Inc.  I am not sure if this book is widely available, but if you run across it, I highly recommend you check it out!


Monday, June 26, 2017

A Married Woman's Tan Lines


You can see that I wear a wedding ring even when I take my rings off, due to the distinct color difference. That is why I call this A Married Woman's Tan Lines. :) No disrespect to those wedded couples who chose not to wear rings. You are just as married. :)


I love the heat and sunshine of summer! I love having the windows open and hearing all the singing birds in the morning, and chirping crickets and croaking baby frogs at night. :)
A beautiful double rainbow we saw recently. BMW and I went for a walk and got caught in the rain. It was a refreshing little shower. It ​was fun to show him the rainbow and then witness his great excitement. :)

 Thankfully, (this is my opinion) the air conditioner needs a part and won't work yet. I don't like air conditioning, if you couldn't tell. :)
*Post Script: The air conditioner has been caused to work since this post was written*

Chalk art on the side walk.


BMW and I have been spending a lot of time outside. We have raised bed gardens to work in, a wading pool to cool off in, sidewalk chalk to be creative with, and sometimes a fire in the smoker/grill to tend. We got pretty nice tans early on this year.

Chicken Legs fresh off of the smoker.
One of the raised garden beds that Mr. In The Mid-west built for me this spring.
These pictures were taken right after I hoed the gardens. I should write a post at the end of summer with some garden progress pictures.

I hope you all have been enjoying your summer as much we have! :)

Do you like air conditioning?

What are your favorite outdoor activities?

Tell us in the comments! :)


Saturday, June 24, 2017

Child Rearing Advice From Proverbs

There is an abundance of child rearing advice found the book of Proverbs. I just want to mention one verse today.

I read this verse this week and it jumped off the page at me.

Correct thy son, and he shall give thee rest; yea, he shall give delight unto thy soul.
Proverbs 29:17

I would spend less time being frustrated if I disciplined my son promptly every time he was disobedient. I would have more rest. I would be able to enjoy him more and be angry less.

God always has the answers. Always. :)

Friday, June 23, 2017

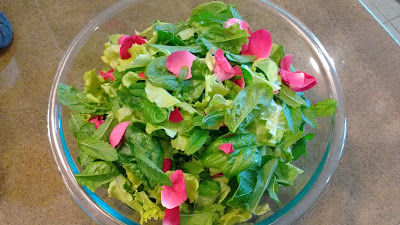
Mint Leaves And Rose Petals: Fresh From The Garden Salad Inspiration


I thought this salad was very good. The mint leaves were refreshing and the rose petals added delicate floral notes. The overall aroma is quite appealing.
I gathered baby lettuce, spinach, mint sprigs, and freshly opened rose blossoms. I washed them in a sink full of water to which I added a few tablespoons of white vinegar. The vinegar not only kills germs, but it also, perks up the lettuce and gives it a good crunch. You can let it soak for up to a few hours. I let mine sit in the vinegar solution for at least 20 minutes.
I probably picked a little too much mint for this batch, but I got carried away with the scissors when I was out in my herb bed.

After washing all the greens and flowers let them drain and gently dry them off.
I take the mint leaves off of their stems. Mint leaves turn an ugly brown when bruised, so they need to treated kind of gently. I don't chop the mint leaves up. I leave them whole. I take the rose petals off of the base of the flower.  These left over stems and flower part I throw in my compost bucket.
I like to toss this salad together several hours before serving time. That gives the mint and rose aromas time to permeate throughout the salad greens.

I served this salad along side roasted chicken thighs (roasted in my new oven!), asparagus Spears, and potatoes.


Why did I take the food out of their cooking pans and plate them onto serving platters? To take this picture. I normally serve everything right out of the pan I cooked it in. I washed twice as many dishes just to take this picture. Was it worth the trouble? Not for the picture, but it did make us all feel kinda special, so that was worth the effort. :)

Wednesday, June 21, 2017

The Great American Solar Eclipse!!!!

The Great American Solar Eclipse, August 21, 2017. 
Mark your calendars!

I am fascinated by the subject of star gazing and solar and lunar cycles. And am beyond excited about the total solar eclipse coming up in August! I have been looking forward to this event for the past two years!

I have read several articles about the event. There are some good articles about how to plan for watching the eclipse. One of my favorites is this article about the top ten solar eclipse viewing destinations.

August 21, 2017 there will be a 70 mile wide swath that cuts across the Continental United States beginning in Oregon and going all the way down to South Carolina. That 70 mile wide swath is the path of totality where you will be able to see the total solar eclipse. Several hundred miles outside the path of totality you will at least be able to view a partial eclipse.


 In the center of the path of totality the total solar eclipse will last for around 2 minutes. That is the part of the eclipse that the sun is completely blocked my the moon.  It will take some time for the whole event to complete. The entire eclipse will take around 2 hours from the time the moon first begins to cross in front of the sun to the moment the moon's path has reached the​ other side of the sun. The 'total' eclipse will occur as the moon is halfway through crossing in front of the sun and it completely blocks the sun from view.

I am planning to travel to a location on the path of totality, but for those who can't make the trip the exciting news is that, you will be able to see a partial eclipse from almost everywhere on the North American continent!! Of course, only if weather permits. That is the tricky part. You can be along the path of totality, but if it is a cloudy day you won't be seeing any eclipse.


You also need to have some solar eclipse viewing glasses. Please don't look at the sun without proper eye protection! You can use a welder's helmet or welding goggles as long as they are number 14 or higher. The cheap welding goggles from Harbor Freight are only a number 10. :( I was hoping they would work, but I am glad I checked. I ordered some paper frame solar veiwing glasses on eBay. I actually ordered several extra and am hoping to turn a profit on them at the time of the eclipse. I had imagined that there will be throngs of unprepared people outside on August 21st wanting to experience such a phenomenal event. I have been disappointed, though, by people's lack of enthusiasm. I have asked friends what their plans are for the eclipse, and then I have to explain the whole thing because they didn't know there was going to be an eclipse. It makes me feel like a space nerd, which is funny because, while I do find these things facinating, I don't really know much about stars and outer space. :)

.....So, I may have a bunch of solar eclipse viewing glasses on hand even after the eclipse.

I am doing my part to spread the word about the Great American Solar Eclipse of 2017. :) I hope you can make plans to see it!

Psalms 19:1 KJV

The heavens declare the glory of God; and the firmament sheweth his handywork.


By the way, "Happy Summer Solstice!"
Today is the official beginning of summer. The amount of hours of sunlight will be greater than any other day of the year. It is the longest day! After this the days begin to gradually get shorter. Let's not think about that it is too sad. :'(  :)

Monday, June 19, 2017

Retiring My Trusty Toaster Oven


This toaster oven was a wedding gift and it has been used and used and used.


When we were first married I had no oven, stove or microwave. This toaster oven, my crock pot, and electric griddle saw me through.


It was about a year before I had a real oven to bake in. About a year and a half later I was without an oven, again. We had moved into our freshly remodeled house (January 2016) and our brand new oven was defective. We had bought it while we were still remodeling and before we moved in the warranty ran out. :( My toaster oven was enlisted again.


Many, many, of the recipes I have shared here were baked in this trusty toaster oven.

It has served me well!

That is the paper price tag still on the door!

A couple days ago, (5/20/17), Mr. In The Mid-west (finally) fixed our new oven!!!!!!


When Mr. In The Mid-west picked the oven out he went straight to the top. It is part of Samsung's professional series.


It has more special features than I know about. I will have to read the manual for some of the functions. I know it is a convection oven and has the capability to read a temperature probe that you can use in a roast or something. I am excited to be using my new oven!


I baked this pizza to celebrate. :)


First item cooked in my new oven.

Friday, June 16, 2017

Mint Chocolate Chip Birthday Cake Recipe And Natural Green Food Coloring


This is the cake recipe I used for Boy In The Mid-west's birthday cake.


I used a chlorophyll liquid to tint the frosting. Chlorophyll is the green pigment in plant leaves. It has many health benefits and can be found at your local health food store or supplement section at some grocery stores or pharmacies. It took about 2 tablespoons to yield this shade of mint green. The shade may vary among different supplement brands. Liquid chlorophyll will easily stain fabrics, so be careful about splashing it on your clothes.


The mint flavor is in the filling between the layers of cake. I used about 2 cups of the vanilla buttercream that I was using to frost the cake for the middle filling. I flavored it with 2 drops of Young Living Peppermint essentially oil.

Without further ado, here is the recipe:


Mint Chocolate Chip Layer Cake

1 3/4 cups flour
1 3/4 cups sugar
1/3 cup cocoa powder
1 tsp. baking powder
1 tsp. baking soda
1/4 tsp. salt
1/2 cup softened butter, cut into 1/2" pieces
2 eggs
1 cup buttermilk
1 1/2 tsp. vanilla extract
1 cup boiling water
5 oz. baking chocolate, melted and cooled to room temperature
1 cup mini chocolate chips

Mix together flour, sugar, cocoa powder, baking powder, baking soda, and salt.
Beat in the butter until well distributed.
Add egg one at a time, beating after each addition.
Add buttermilk and vanilla. Gradually add water and melted baking chocolate while mixing. Stir in chocolate chips.
Prepare 2, 9" round cake pans by lining with wax paper, greasing, and flouring.
Divide batter evenly between the two prepared cake pans.
Bake in preheated oven at 350°F. for 30 minutes or until a wooden toothpick inserted in the middle comes out clean.
Cool 20 minutes before turning out onto a wire rack to cool completely.

Frosting Options:
Your favorite frosting recipe, chocolate or vanilla.
The frosting I used was Whole Egg Vanilla Buttercream.

Filling Between Cake Layers:
Option 1
1/4 cup softened butter
2 cups powdered sugar
2 TBS. milk
1/4 tsp. peppermint extract
2 drops green food coloring
1/2 cup mini chocolate chips
Whip butter. Incorporate powdered sugar. Add milk, extract, food coloring, and chocolate chips.

Option 2 (What I did)
Make one recipe of Whole Egg Vanilla Buttercream. Yields about 5 1/2 cups.
Tint with 2 1/2 Tablespoons liquid chlorophyll.

For the filling between the cake layers:
Separate 1 3/4 cups of green vanilla buttercream and add into it-
1/2 cup mini chocolate chips
2 drops YL peppermint essential oil

Mix well. Use, when assembling the cake, as the filling between the cake layers.

Wednesday, June 14, 2017

Whole Egg Vanilla Buttercream Frosting


This recipe is from my America's Test Kitchen Cook Book. It is unlike any other frosting I have made before. It doesn't call for any powdered sugar, which I consider a plus.

-Freezing-
I made this frosting several days ahead and froze it. The day before I wanted to use it I put it into the refrigerator to thaw and whipped it up again with my stand mixer before frosting the cake.


Whole Egg Vanilla Buttercream Frosting

4 whole eggs
1 cup granulated sugar
1 tsp. Vanilla extract
Pinch salt
1 pound softened unsalted butter, cut into eighths

Combine eggs, sugar, vanilla, and salt in the bowl of a stand mixer; place bowl over a pan of simmering water. Bring up to 160°F. stirring all the while. The mixture should be thin and foamy.
Remove from heat and, using whisk attachment on your stand mixer, whisk on medium-high speed until cooled down to room temperature, about 5 minutes. The mixture will become light, cream colored, and very fluffy.
Reduce the speed to medium and add softened butter one piece at a time. (After adding half of the butter, the mixture may look curdled; it will smooth with additional butter.)
Once all the butter is added, increase speed to high and beat 1 minute.

Yields: 4+ cups, enough to frost an 8" or 9" round layer cake (2 layers).

Monday, June 12, 2017

Buttermilk Pound Cake Recipe


I made this to be served with strawberries and whipped cream after church on our mid-week service.

We always like to stay and visit after church and we normally go to the local fast food establishment and fellowship with the pastor's family until restaurant closes.

I thought it would be nice to stay and fellowship over dessert at church one night, so I made this pound and brought sliced-sugared strawberries and whipped real cream.

The fellowship was great (as usual) and I got a few compliments on the pound cake. I am going to write the recipe here so that I don't forget which one I made.

As I normally do, I substituted kefir for the buttermilk in the recipe. I don't have anything against buttermilk. I like to keep kefir start going, though, and that means I never have the need to buy buttermilk. I never buy buttermilk, but I always have kefir. :)

Buttermilk Pound Cake

1/2 cup (1/4 pound) softened butter
2 1/2 cups sugar
4 eggs
3 cups all-purpose flour
1/4 tsp. baking soda
1 cup buttermilk (I used kefir)
2 tsp. vanilla extract
1 tsp. almond extract
Zest of 1 large orange (omitted due to lack of oranges)
Zest of 1 small lemon (omitted due to lack of lemons)

In a large mixing bowl, beat butter until creamy. Gradually add sugar, beating until mixture is light and fluffy. Beat in eggs, one at a time, beating well after each addition.
   Sift flour, measure, and sift again with soda. Beat into creamed mixture alternately with buttermilk mixed with vanilla, almond extract and zest (begin and end with dry ingredients). Pour into greased and floured 10 inch tube cake pan. Or 2 loaf pans.
    Bake in a 350° F. oven for 1 hour or until toothpick inserted comes out clean. Cool in pan 5 minutes; turn out onto wire rack. Makes 12 to 14 servings.

Friday, June 9, 2017

Traditional Almond Biscotti


This was the first time I have tried making Biscotti. I read an article on npr.org about the qualities of good Italian Biscotti to educate myself on the ingredients, method, and end product before I attempted making any. You can read the article here if you're interested. After being taste tested, my Biscotti had several favorable reviews. :)

This recipe was quite an endeavor for me because I had to cook it in a toaster oven. (I have been doing all my baking in my toaster oven for quite sometime. More about that in an upcoming post.) The Biscotti took twice as long to complete because I had to bake it in two batches. So, I was in the process of making Biscotti for 3 hours the afternoon that I tackled this project! I was glad to hear that my efforts were worth it when my Mom and Mr. In The Mid-west's Mom (who were the recipients) said that they enjoyed the Biscotti very much.

Traditional Almond Biscotti

3 cups unsalted whole almonds
1 cup granulated sugar
1 cup light brown sugar
1/2 teaspoon ground cinnamon
2 teaspoons baking powder
2 1/2 cups all-purpose flour
3 jumbo eggs (or 4 large eggs), plus 1 egg, lightly beaten, for brushing tops of loaves
1 teaspoon pure vanilla extract
Zest of 1 large orange (1 to 2 teaspoons)
Position racks in the upper and lower thirds of the oven and preheat to 350 degrees. Line 2 large baking sheets with parchment paper.
Place almonds in a single layer on a baking sheet and toast in the 350-degree oven  for 10 minutes. Remove and set aside.
In a large bowl, hand mix toasted almonds, sugars, cinnamon, baking powder and flour.
In a small bowl, whisk eggs. Add the vanilla and orange zest and whisk until well blended. Add to the flour mixture. Stir a few times. Work the batter together with lightly floured hands. The mixture will be sticky, but persevere. Keep squeezing the batter with your hands until a dough starts to form. Once the dough is firm, form a ball. Divide the ball into 4 equal pieces.
On a lightly floured surface, place 1 piece of dough, and using your hands, roll into a log shape that is approximately 8 inches long, 2 inches wide and 3/4 of an inch high. If it's sticky, simply dust your palms with more flour. Repeat with remaining 3 pieces of dough. Place 2 logs per baking sheet. Brush loaves all over with lightly beaten egg.
Bake for 40 minutes, rotating pans halfway through, or until the tops of the loaves are shiny and deep golden. Cool on a rack for about 20 minutes before slicing.
Place a loaf on a cutting board. Using a large serrated knife, cut 3/4-inch-thick slices, either straight or on the diagonal. Use a sawing motion to prevent crumbling. Each loaf should yield 9 to 11 cookies. If the cookie is crumbling, then let it cool a few more minutes. Don't let it rest too long, however, or it could become too hard to slice.
Place slices on their sides back on the baking sheets. Place in the still warm oven with the temperature off and the door closed for 30 to 60 minutes. The longer they stay in the oven, the harder they will become. Remove from oven and cool completely before storing in an airtight container, preferably a tin, which helps keep them crisp. Stored properly, biscotti will last up to a month.

Wednesday, June 7, 2017

Almost Disaster! Honey Taffy, Story And Recipe


I made this honey taffy for my mother-in-law's Mother's Day gift box.

The day I decided to make these I got Boy In The Mid-west down for a nap and then I headed to the kitchen. I looked up the YouTube video where I had gotten the recipe and refreshed my memory of the cooking method and quickly jotted down the instructions.

The recipe requires you to boil the Honey until it reaches 260°F. on a candy thermometer, also known as the soft crack stage. Once accomplished the Honey is poured into a well greased pan to cool. When it is cool enough to handle you are supposed to peel it out of the pan and stretch it with well buttered hands.

I don't have a candy thermometer. I decided to use the "drop in cold water" test to determine when the honey reached soft crack stage. I was also really cautious about letting it get too hot and becoming hard candy.

When I thought it had reached temperature I poured it into the pan to cool.

Once cooled down enough to handle I went to stretch it. That is when I found that I had made a big mistake...
The candy was really soft and really sticky. There was no way that I would be able to pick it up and stretch it. Uh-oh!
It had not reached the soft crack stage.

What was I going to do?
Using a rubber spatula I began stiring the warm, soft honey. I stirred and stirred, and folded and folded, and kneaded with that spatula for 20 minutes. At first not much happened, but I persevered, and eventually the honey stiffened up a little and became lighter in color as air was incorporated into the taffy.
It still wasn't exactly taffy, but it was thick enough to be wrapped in wax paper. I was just grateful that it wasn't a total loss.

I hope to have better success next time. "Practice makes perfect," right?

Here is recipe Incase you want to give it a try:

Honey Taffy

1 1/2 - 2 cups Honey
Butter
Wax Paper cut into squares for wrappers

Place honey in a saucepan. Bring to a gentle boil over medium heat.
Boil, stiring occasionally, until honey reached 260°F. on a candy thermometer. (8-10 minutes) This is the soft crack stage.
Meanwhile heavily grease a 9×13" pan with the butter.
Once the honey has reached the soft crack stage pour it into the prepared pan to cool down enough to handle.
While the honey cools I recommend that you wash your saucepan while it is hot and before the candied honey has a chance to solidify on the saucepan.
When the honey has cooled enough to be handled, grease your hands with butter and peel the candy out of the 9×13" pan. You want to stretch and fold the candy over and over until it becomes too stiff to keep pulling. It will lighten up it color and come more like carmel color.
Shape the taffy into thin ropes. Cut the ropes into small pieces and wrap in waxed paper.
Enjoy your sweet treat!

Monday, June 5, 2017

Lavender Oatmeal Bath Soak Recipe


I made this for my mother-in-law's Mother's Day gift.

I just tried it (5/18/17). It seemed to help with my sun burn. It was very soothing. Normally a sunburn, like what I had, would cause enough damage to make my skin peel about week later, but with the help of this healing soak my nose didn't peel at all! I was definitely grateful for that. :)


Lavender Oatmeal Soak Recipe

1 cup Epsom salt
1 cup oatmeal, ground in a blender until fine powder
1/2 cup baking soda
10 drops tea tree essential oil
15 drops lavender essential oil
5 drops frankincense essential oil

Mix well until the oils have been thoroughly distributed and blended. I used my food processor to make sure it was mixed well.

Store in a jar or container.

For a calming and relaxing bath stir 1 cup of mixture into a warm bath. Soak for 20-30 minutes.

Friday, June 2, 2017

Mother's Day Gift Box

I put together a tea party gift box for my mother-in-law's Mother's Day gift.


I was inspired by Stephanie from The Enchanted Rose. She hosted a tea cup exchange recently and, while I didn't participate, I did very much enjoy seeing the pictures of everyone's exchange gift boxes. As I scrolled through the pictures I thought, "This would be so fun to do for someone!" And suddenly it dawned on me that Mother's Day would provide the perfect opportunity.

I made a list of items that I wanted to either purchase or make. I was so excited that I even drew a sketch of what things would go into my box. :)

Mother's Day Gift Box List:
Pretty Tea Cup
Tea
Homemade Biscotti
Homemade Honey Taffy
Bath Salts Blend
A Magazine or Book

Next time I went thrifting my eyes were peeled for a pretty tea cup and anything tea party like. I found some rose shaped floating candles, delicate cloth napkins, a beautiful tea cup, and an Ideals magazine, which I was really excited about because my husband's Mom really likes Ideals magazines.


The tea cup took a couple thrift stores to find. It was part of a full set of China. I felt a little bad about breaking up the set, but the pieces were all priced individually and I didn't need to buy the whole set.


The next few posts are going to be relating to some of the things I made to go in this Mother's Day Tea Party Box.

I will be sharing the bath salts recipe, the honey chews recipe (and almost disaster!), and the traditional almond biscotti recipe.

I hope you come back for the recipes! See you soon. :)

Thursday, June 1, 2017

Halfway Through The Bible

Yesterday I reached the halfway point in my Bible reading. My Bible has 1044 pages so page 522 is the halfway point.

I do have some blueberry stains on this page. :)

I am still reading out loud, even though Boy In The Mid-west isn't always listening.

 But he answered and said, It is written, Man shall not live by bread alone, but by every word that proceedeth out of the mouth of God. 
Matthew 4:4 KJV

I praise God for preserving every word for us to read. I am thankful that I can hold the very words of God Almighty in my Authorized King James Bible!

 The words of the LORD are pure words: as silver tried in a furnace of earth, purified seven times. Thou shalt keep them, O LORD, thou shalt preserve them from this generation for ever.

Psalms 12:6+7KJV