Showing posts with label Snack. Show all posts

Friday, December 5, 2025

Roasted Pumpkin Seeds


After all the pumpkins were processed I had 2 quarts of pumpkin seeds. If I only have a few seeds, I toss them with oil and salt and roast them. With this many seeds the effort of boiling them in salt water is worth the trouble. 

Step 1. Boil the seeds for 10 minutes in salt water: 1 TBS. of salt per cup of water. 

Step 2. Dry seeds well on a towel.
Step 3 +4.
Toss with a small amount of oil and roast in a single layer at 350° for 20ish minutes stirring a few times.
Allow to cool a few minutes before digging in. 
As you can see everyone here has been enjoying the bounty!


Tuesday, September 24, 2024

Pecans!


I was so surprised and delighted to find this pecan tree down our lane. It is not on our property but it is close to the road on an empty lot.


When I was a young girl my family would travel to Arkansas just about every October to visit my Great Uncle Tony. Down the street from his house stood a big old pecan tree in a Church yard. Uncle Tony knew the people who attended church there. He said they wouldn't mind if we collected the pecans. 


There were so many pecans on the ground. We'd fill a couple grocery sacks in a few minutes and bring them back north to enjoy for a couple weeks.

It was a special memory. Pecans were a rare treat.

I knew there was a variety of pecan that grows this far north but I had never seen one nor did I expect to. 

I could hardly believe my eyes when, as we drove by one day, I looked out at the nut clusters on this tree and thought, "Those look like pecans. Can it be?"

Yes, it can be! I walked over with the children and we picked up a few handfuls. We cracked them and enjoyed them. What a treat!

Monday, July 24, 2023

Corn Dog Recipe!


This recipe is from some friends of mine who I came to know as a teenager. My family threw an annual county fair themed party when I was young. My family and many of our friends were heavily involved in the local 4-H county fair. After the fair had concluded my parents held a party for our friends that we called The Survival Of The Fair Party. The food that we made for the party was all the fair foods that we were too cheap to buy during the actual fair. I don't blame my parents for not buying us children fair food. There were 8 of us at the time and it would have cost them an arm and a leg to feed us all at fair prices. I can only remember eating an elephant ear from the fair one time and we had to split it up between us all.

That doesn't mean we were deprived, though. Mom could make us dozens of elephant ears at home for the price of one fair-priced-elephant-ear, and she did!
During the Survival Of The Fair Party we feasted on corn dogs, pork tenderloin sandwiches, Philly steak and sausage sandwiches, perogies, lemon shake ups, funnel cakes, and elephant ears! Everything was delicious! 

This is the corn dog recipe that we used.
One of our friends gave us this recipe to use for the Survival Of The Fair Party so this recipe bears their name. 

Whitesell's Corn Dog Recipe 
1 egg
1/2 c. milk
1 c. Bisquick (or into a 1 c. measurer add 2 t. baking powder, 2 t. sugar, 1/2 t. salt then fill the measuring cup the rest of the way with flour.)
2 TBS. cornmeal
1/2 t. dry mustard
1/4 t. paprika
1/8 t. pepper
3 TBS. sugar
1 lb. hot dogs
Mix the batter ingredients together.
Pat the hot dogs dry with a towel or paper towel.
Pour the batter into a tall glass or drinking cup. Using wooden skewers dip the hot dogs into the batter.
Deep fry at 375° F. until golden brown.

For mini corn dog bites:
Cut the dried off hot dogs into 1/4ers.
Using a fork dip each hotdog piece into the batter and then slide it off of the fork into the hot oil. Fry until golden brown. Drain on paper towel before serving.


Tuesday, October 25, 2022

Let Thy Food Be Thy Medicine

 Two ways to eat fresh onions and garlic

Why eat fresh garlic and onions? These bulbs contain a component called Allicin among other health promoting components. Allicin inhibits the reproduction of bacteria and viruses. I don't know all the science, but you can read more HERE on Herbazest.com.

Whenever I am fighting a bacterial or viral infection I try to consume as much garlic as possible.
Most of the time I straight up eat garlic cloves. But, eating garlic can be way more pleasurable.

For onions try this Tomato Onion Salad.

Dice half an onion and a medium tomato.
Mix together with salt, pepper, basil, a couple tablespoons of mayonnaise and as much apple cider vinegar as you like (2ish Tbsp. for me).

This salad was so delicious that last time I was sick I was eating this salad twice a day. That makes 1 whole onion a day! I think that it did me a lot of good and it was real food as medicine.

I love garlic! There are many ways that I get fresh garlic into my diet. I've made a garlic and oil emulsion as a salad dressing. That is a good way to get a few fresh garlic cloves with a meal. My family has a tradition of making what we call Garlic Salad, which is a garlic spread made from cooked eggplant pulp, bread crumbs, olive oil, vinegar, and salt. It is similar to the Lebanese dish; Baba Ganu. I quit adding the bread crumbs and I like it much better that way. (I never told my Grandma.Shhh)

One of my favorite ways to eat fresh garlic in a meal is a variation of Huevos Rancheros.

I mix 3-4 cloves of minced garlic with a couple ounces of cream cheese.

Spread the cream cheese mixture onto toasted corn tortillas.

Top with a fried eggs and chopped cilantro.

And, for a added boost for flavor and health promoting capsaicin, add Tabasco sauce or your favorite hot pepper sauce. 
There you have it! Two ways to make food your medicine by utilizing the flavors of fresh onions and garlic!
I hope you enjoy!
Let me know if you have tried any of these before or how you use food as your medicine!

Psalms 104:14 
He causeth the grass to grow for the cattle,
 and herb for the service of man:
 that he may bring forth food out of the earth;

Wednesday, April 27, 2022

Tea, Cleaning, And Creative Use Of Ham Glaze

Tea

Jennifer from My Cubby Crafts talked about mixing tea blends in a post last week. She put it in my mind to share the tea blend that I have been brewing lately. I prefer herbal teas to black tea. I have Anise seeds that I crush with a knife.


I combine the crushed Anise seeds with some Chocolate Mint that my Sister-in-law gifted me, (She blogs over at Sunshine Country) in my new tea bags. I am really liking my tea bags. They work better than the tea filter spoons. Those spoons are nice, but they usually leak some tea leaf particles into my cup. 


This tea is pleasant to my palette; a little cooling from the mint and a little sweet from the anise. This blend is soothing for the belly.


Cleaning

Here is a little cleaning inspiration. My Lazy Susan hadn't been cleaned in a couple years, since the initial clean before we moved in two years ago. 

There was crumbs from the toaster, browning sauce that leaked, and general grease and dust.
It looks much better now and it didn't take long to unload the shelves, wipe them off and scrub them a little, and then restock the shelves.


Not and eye sore any more! :)


Ham Glaze?

I don't know about you, but I never use the package of ham glaze that often comes in a little pouch attached to ham from the grocery store.

I mean I never use it for it's intended purpose. I used to stash the glaze packets in the spice cabinet. They accumulated there until there was quite a pile.

One time I had a creative idea to make the glaze and pour it over popcorn. I liked it a lot! It was sweet and spicy. That is how I use ham glaze now. :)

 I just follow the instructions on the package for preparing the glaze. It works fine. It is a good caramel-y texture. 

Do you use the ham glaze that comes with the ham? Tell me if you like it on your ham, throw it out ("I can't believe you would serve your family silicon dioxide and who knows what else!"), have a stash that you don't know what to do with, or have come up with your own creative use for ham glaze. 

I hope everyone is having a good week! Until next time, here is a verse in parting:

Revelation 7:12  
Saying, Amen: Blessing, and glory, and wisdom,
 and thanksgiving, and honour, and power, and might, 
be unto our God for ever and ever. Amen.


Thursday, March 10, 2022

Cheese Danish Pastry


This Cheese Danish pastry is so flaky! When combined with the lightly sweetened, lemony cream filling this becomes a treat worth going off of one's gluten free diet for! Ask me how I know. ;)

Cheese Danish Recipe


Pastry Dough

4 cups Flour
1/2 cup + 2 TBS. Cold Water
1/2 cup + 2 TBS. Cold Milk
1/4 cup + 2 TBS. Sugar
3 TBS. Soft Butter
1 TBS. + 1/2 tsp. Yeast
2 tsp. Salt

Butter for Laminating:
1 1/2 cups Butter (2 1/2 sticks)

Cream Cheese Filling:
2 8oz. Blocks Cream Cheese
2 Egg Yolks
1/2 cup Sugar
1 tsp. Lemon Juice
1 tsp. Vanilla Flavoring
1/4 tsp. Lemon Oil (optional)
 

Combine ingredients to form a dough. Knead briefly.
Refrigerate over night in airtight package.

The following day, cut the butter lengthwise into 1/2 inch thick strips. Arrange these butter pieces on a large section of wax paper. Cover the butter with another section of wax paper. Using a rolling pin smash the butter together and roll the piece into a 7 1/2 inch square. Chill this butter square in the refrigerator while you prepare the dough.
Take the dough from the refrigerator. Roll it into a 10 1/2 inches square.
Retrieve the butter from the refrigerator and position it, at an angle, onto the dough.
Fold the extending corners of dough over the butter. Pinch the seams together, encasing the butter in the dough. As illustrated in the picture.

Roll the dough/butter package into a 8×24 inch rectangle.

Fold 1/3 of the dough over onto itself.
Fold the other end of the dough over the center layers.
Wrap the dough of plastic and refrigerate 20 minutes.
Repeat this rolling, folding, and resting twice more. Wrap in airtight container and refrigerate overnight.

The following day mix the cream cheese filling ingredients by first beating the cream cheese until smooth and then adding the rest of the filling ingredients

Take the dough from the refrigerator and press it in several places with the rolling pin to "wake up" the dough.
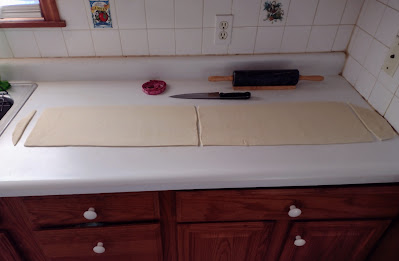
Roll the dough into a very long and narrow rectangle about 44×10 inches. 
Cut a couple inches off of the ends to square up the ends. 
Cut the rectangle into two even pieces. As shown.

Dollop half of the cream filling down the center of each piece of pastry.
Spread out the filling, leaving about a 1 inch space from the ends. 
Using a sharp knife cut 1/2 inch wide strips all along each edge. As shown.
To make the woven top of the pastry; 
Take a dough strip and stretch it (stretching it is supposed to help the layers flake better).
Fold the strip over the cream filling. Repeat with each strip, alternating from one side to the other side, all the down the the end.
Place each Cheese Danish on a baking sheet, lined with parchment paper.
Make an egg wash with the egg white left over from the filling. Mix the egg whites with 1 TBS. of water and brush each Danish with the egg wash.
Let the Danishes rest for 30 minutes.
Preheat oven to 400° F.
Before the Danishes go into the oven give them another egg wash.
Bake 25 minutes, rotating half way through the baking time.
Cool until warm. 
Enjoy!

Thursday, January 13, 2022

Vanilla Popcorn Recipe!


This popcorn is a sweet treat! I find it easier to make than Carmel Corn or Kettle Corn. It is the perfect snack for movies night, Fourth of July fireworks, and any other activity that requires finger food.

Vanilla Popcorn 

6 quarts Popped Popcorn

1 cup Sugar

1/2 cup Butter

1/4 cup Corn Syrup

1/4 tsp. Baking Soda

1/2 tsp. Vanilla Extract

Combine sugar, butter, and corn syrup in a sauce pan.

Over medium-high heat bring to a boil. Boil, stirring, for 2 minutes. 

Remove from heat and quickly add baking soda and vanilla. Stir throughout.

Pour over popped popcorn. And stir to coat.

Enjoy!


Tuesday, December 21, 2021

Spritz Butter Cookies With Wilson Cookie Press


Spritz Butter Cookies Recipe

1 1/2 cup Butter, softened
1 cup Sugar
1 Egg
2 TBS. Milk
1 tsp. Vanilla Extract
1/2 tsp. Almond Extract
3 1/2 cups Flour
1 tsp. Baking Powder

Preheat oven to 350° F.

In medium bowl, combine flour and baking powder.

In large bowl, beat butter and sugar with electric mixer until light and fluffy. Add egg, milk, and extracts. Add flour mixture; mix well.

Fill cookie press with dough and fit with desired plates; press cookies onto ungreased cookie sheets.

Bake 10-12 minutes or until edges are light golden brown. Cool 2 minutes on cookie sheet; remove to cooking rack and cool completely.

Makes about 7-8 dozen.

Tip: Do not refrigerate the dough before using the cookie press. The dough needs to be soft to squeeze through the press.


This cookie press is a great tool for making butter cookies. 

It is so easy to use: 

Load with batter.


Place in position.


Squeeze the trigger.


Lift.


Ta da!


It is also easy to change cookie shape plates.


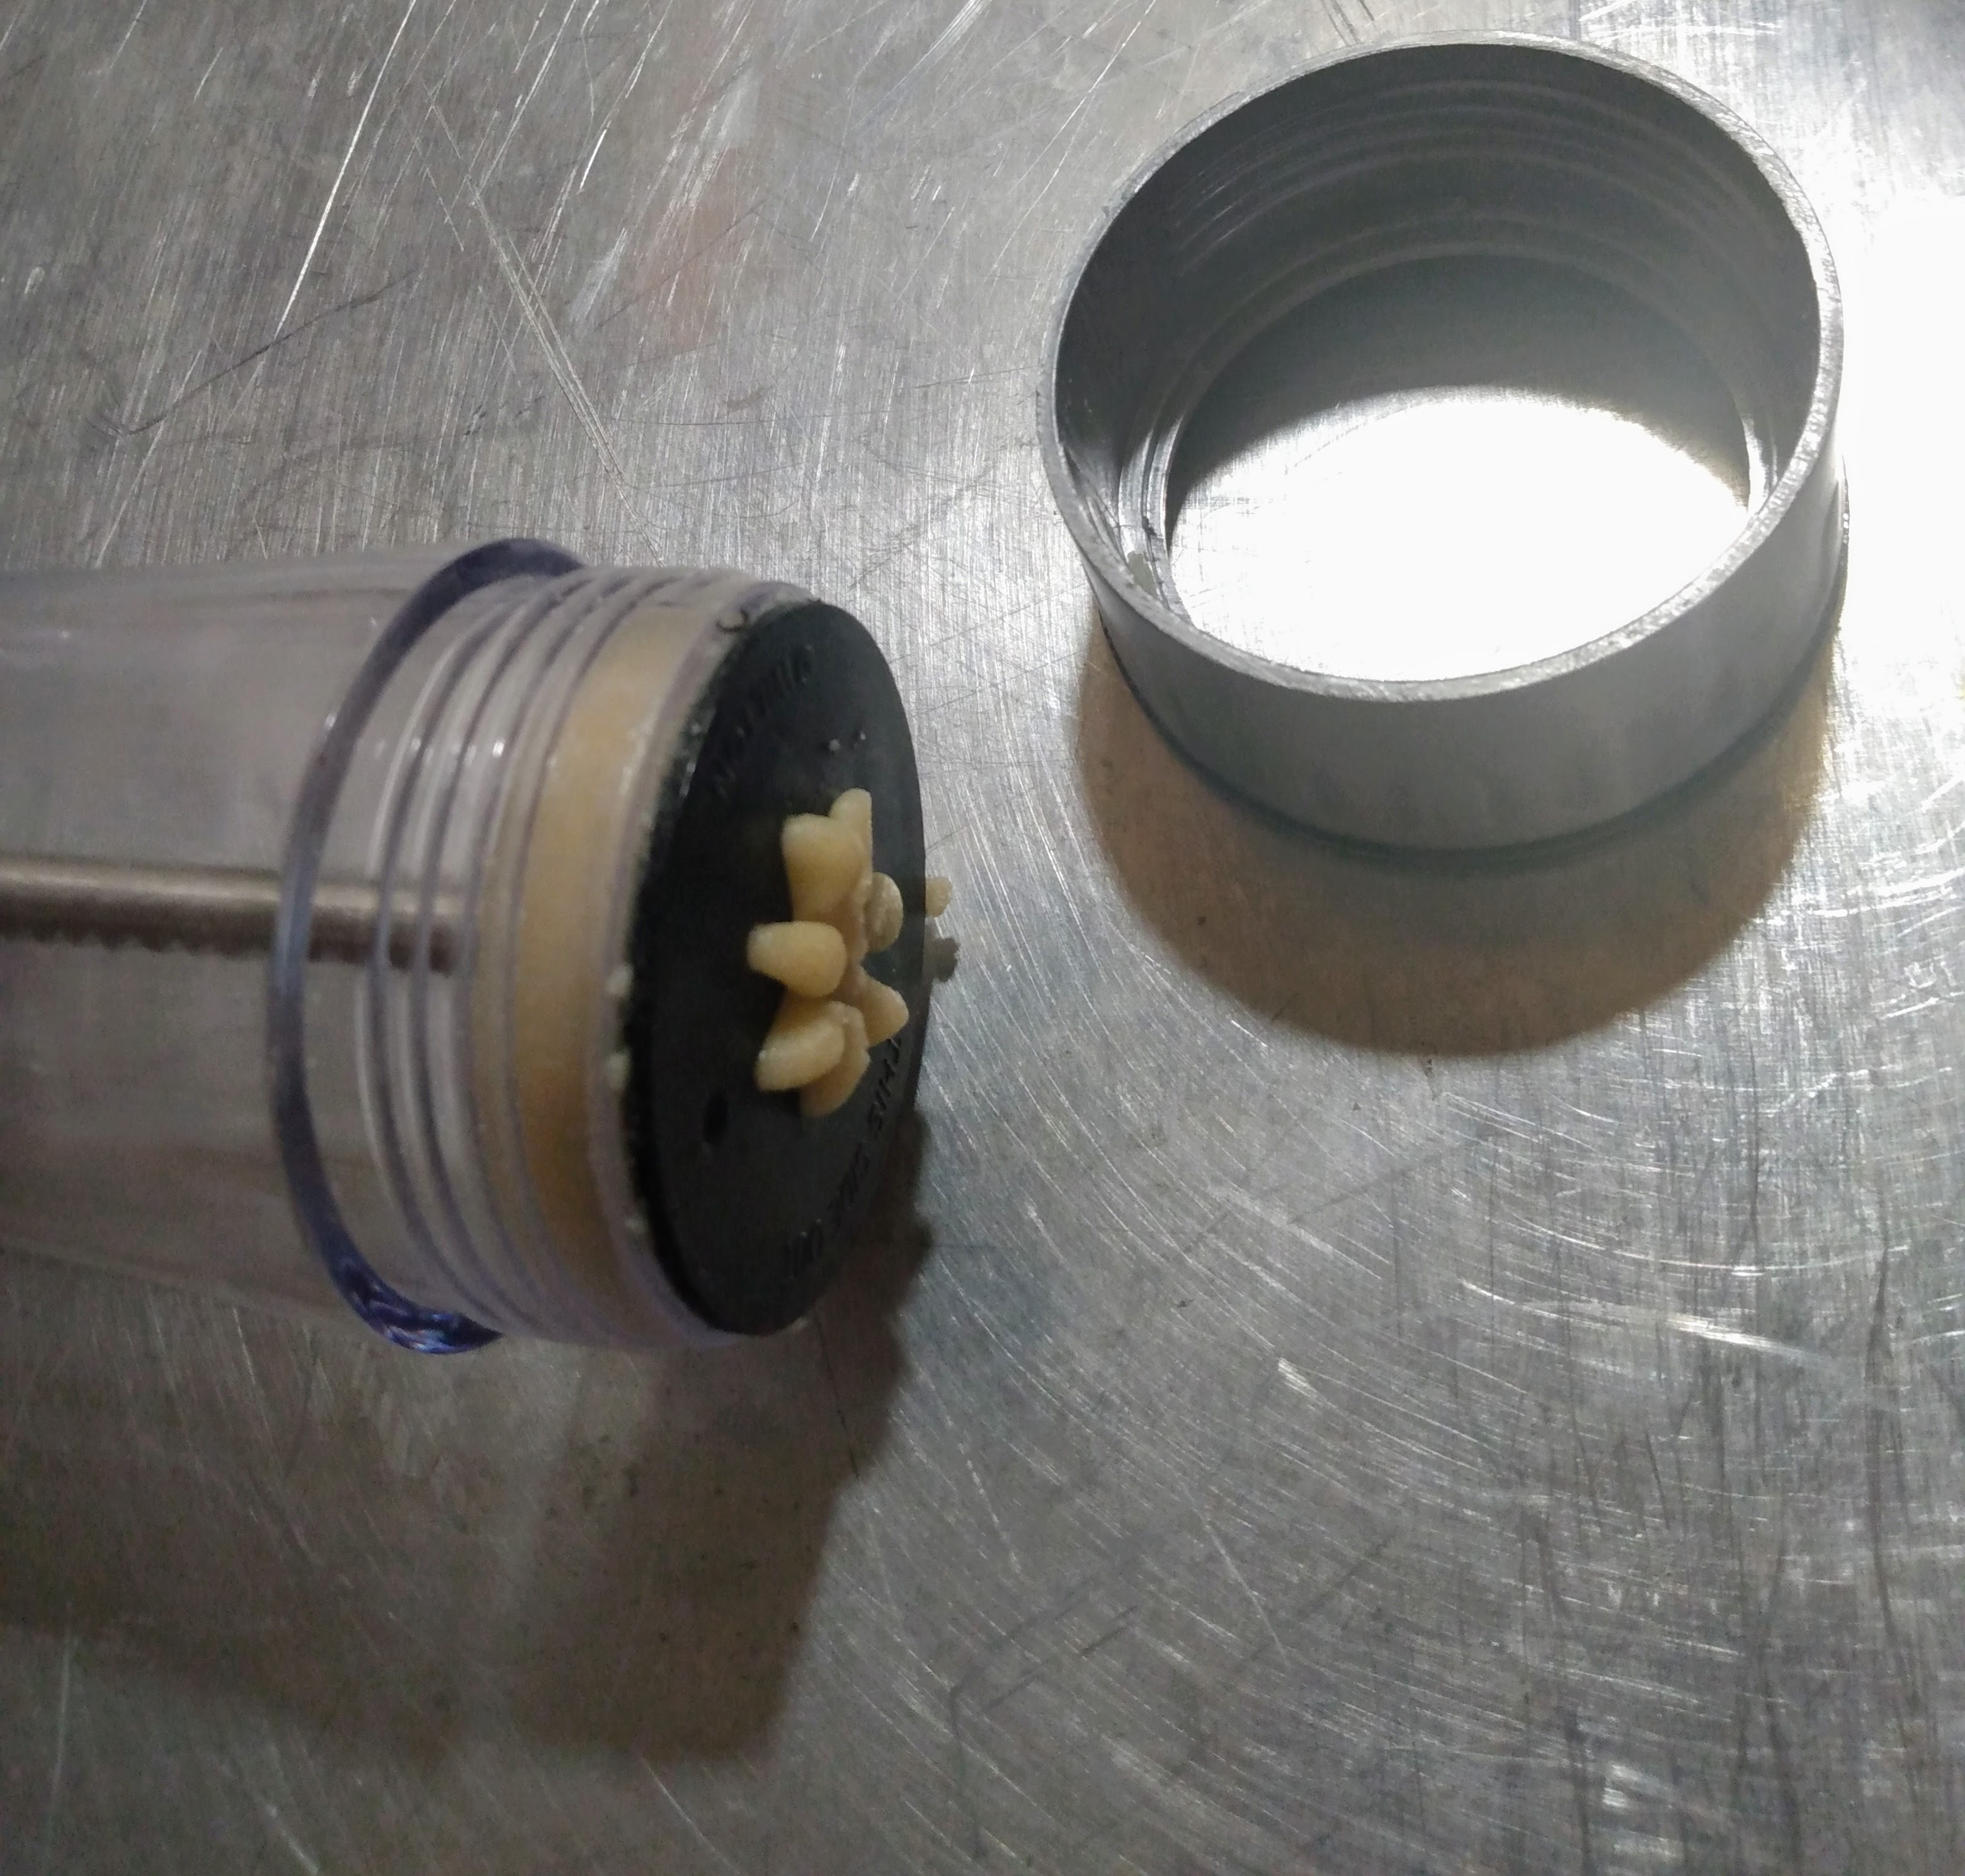
Unscrew the collar. And remove the plate that you want to replace.


Select a new cookie shape plate. Put it into place with the correct side facing out, as indicated on the plate.


Screw the collar back on and load the press with more cookie dough.


I really like my cookie press. Mr. In the Mid-west bought in for me several years ago. 


I used to keep a container of these Spritz cookies on hand in the freezer back when I was a, "Cookie Jar Mama." I wrote a blog post about it at the time. You can read the post about that era HERE. Memories..... :)

Do you have a cookie press?

Do you like Spritz Butter Cookies?

Let me know in the comments section!