Monday, April 17, 2017

My Favorite Chocolate Pudding Recipe


Recently, I was looking for my chocolate pudding recipe (NOT pictured above). I couldn't find my recipe. It must be in a storage box 'who knows' where.

I started making the pudding. I have made 1/2 a recipe several times, as well as the full recipe. I couldn't remember if I used 1/4 cup of cornstarch with 2 1/2 cups of milk, or if I needed 1 or 2 eggs, etc...

I Googled, "homemade chocolate pudding from scratch." Believe it or not, Google wasn't much help. None of the recipes on the first page had eggs in them. Then I Googled, "homemade chocolate pudding with eggs." Still no help. The recipes that came up only talked about why they didn't use egg, or called for chopped semi sweet chocolate bars, and weird stuff.

"Thanks a lot, Google!"

The resulting pudding wasn't that great. The texture was a little grainy and loose. :/

So, a couple weeks ago, when we visited my family, I took a picture of my Mom's copy of the recipe. Now I am going to post it here on my blog. That way I will never lose it again. :)

This chocolate pudding recipe is adapted from the Storey's Guide To Raising Dairy Goats   Goat Milk Pudding Recipe. It is the best homemade pudding recipe, in my opinion. :)

My Favorite Chocolate Pudding

2 1/2 cups whole milk
Scant 1/2 cup of sugar
Scant 1/4 cup of cocoa powder
Pinch salt
1 egg
1/4 cup cornstarch
1 TBS. butter
1 tsp. vanilla extract

• Mix 2 cups of milk, the sugar, the cocoa powder, and the salt in a heavy sauce pan. Heat slowly.

• While milk is heating, beat the egg. Add to milk mixture, and bring to scalding point, stirring constantly.

• Dissolve the cornstarch in the remaining 1/2 cup of milk, and add to scalding milk, again stirring constantly. Stir until thickened, and remove from heat.

• Add butter and vanilla extract.

• Chill and serve or serve warm if you prefer. Enjoy!

Friday, April 14, 2017

Cloth Pad Cleaning And Care

{Buy My Cloth Pad Pattern HERE.}

Storage:

I just keep my cloth pads in the bottom drawer of my bathroom vanity.


You can store your cloth pads wherever you would normally store your disposable pads.

Soiled Pads:


When you remove a soiled pad fold it in half and use the snap to fasten so that it stays closed.

Do NOT put soiled Pads in a bucket of water. You will have mold and mildew problems.

You need to have a bin, or tub, or bucket, or some type of dry container to collect your soiled pads in until wash day. I use a mop bucket, because it is convenient for me.


A very cute and somewhat discreet option is to use a 'wet bag.'   You could stow it below your sink or hang it on a hook it the bathroom.

The term 'wet bag' comes from the cloth diapering community, I think. It was originally a waterproof cloth bag that you carried in your diaper bag and used to put soiled diapers into while you were away from home.

You can purchase wet bags from companies that market them for cloth pad users like Glad Rags or from companies that are marketing more for cloth diapers like Kelly's Closet. You can find them on Amazon too. Just do a Google search they're everywhere. There are many unique and homemade wet bags on Etsy, like the one below. Click here for link. (NOT an affiliate link)

The afore mentioned businesses also carry small travel size wet bags with two zippered compartments. These are great for carrying in your purse. You can use one zippered compartment for clean pads and one zippered compartment for dirty pads.

Please don't get the idea that when you take a soiled cloth pad off it must be put into some waterproof container because it is so messy and it might drip or something like that. That is just not true. The very center of the pad is usually the only dirty part, and it is not sloppy or oosing all-over the place. Once you fold the pad in half and button it the blood isn't going anywhere. I have been known to put folded and fastened soiled pads straight into my purse just like that to transport home without any trouble.

Cleaning:

I have enough pads that I can wait for my period to be over to wash all my pads at one time. If you don't have enough pads to last your entire period you will need to wash them and reuse them.

The washing method I am going to describe is the way that I wash my cloth pads. There are a lot of ways you could go about washing your pads. I have been pretty successful at keeping my pads relatively stain free with this method. After as many cycles as I have used my pads for there is bound to be at least some shadow stains.

Soak #1:


On wash day, I un-snap all my pads and lay them flat in a 2 1/2 gallon bucket. I run COLD water in the bucket until all the pads are submerged. It is important to use COLD water. Hot water will set protein stains, like blood.

I add 1/4 scoop of powdered hydrogen peroxide cleaner (I use Dollar General's generic brand of a product similar to Oxyclean). Mix pads and cleaner around a little bit to dissolve and distribute the powdered hydrogen peroxide.

Let pads soak for a few hours (3-4 hours usually). I am not going to lie, the water gets really dark. You want all of the blood to rinse out of the pads, and this first soak really reminds you that that is what's going on.

Drain the water. Squeeze the water out of the pads. When I squeeze the water out of my pads I never wring them or twist them. I feel like wringing them out will be to tough on the materials. Maybe I feel that way because I made them myself and I would hate to see them fall apart.  :)

If you have a waterproof PUL layer in your pads you definitely don't want to wring them or twist them. That could damage the PUL.

Rinse:


Put them back into the bucket and fill with COLD water. Swish around, drain, squeeze, and repeat until rinse water runs clear. I usually do this twice.

Soak #2:


Before I soak the pads the second time I rub Fels-Naptha soap onto any stubborn stains.


I don't spend much time stain treating. I just rub the soap on there and throw it back in the bucket.


I use a 1/4 scoop of powdered hydrogen peroxide cleaner, again, and fill the bucket with cold water, again.

This second soak only takes 1-2 hours.

Drain, and squeeze the water out of the pads.

Washing:

You can wash your pads in a regular load of laundry.

I just wash my mine in whatever load of laundry is ready to wash. I don't worry much about the water temperature at this point in the cleaning process.

Do NOT add softener or dryer sheets to loads of laundry containing your cloth pads. Softener can reduce the absorbability of your pads.

Drying:


You can tumble dry or hang dry your cloth pads.

If you have a waterproof PUL layer in your pads it is best not to dry them on high heat. The heat can damage the PUL.

When your pads are dry store them in their normal place. Don't forget to keep one (or two) in your hand bag: purse, baby bag, back pack, etc...

Miscellaneous:

How many cloth pads do you need? The answer depends on what your periods are like and your personal preference.

I have 22 pads in my stash: 2 very heavy/overnight pads, and 20 medium to heavy absorbency pads in various sizes.

I don't have very heavy periods and I rarely go through all my pads.

Some women find that they use more cloth pads than they would disposable pads because they change them more frequently. With cloth pads you don't have to worry about 'using them up,' 'running out,' or 'wasting' any. You can change them as often as you feel like it.

Some women use less cloth pads than they would disposable pads because their periods lighten up after they switch to cloth. This doesn't happen for everyone, but I have heard of it happening for more then one woman.

The chemicals in disposable pads could play a role in why some women have lighter, less painful, periods when they switch to cloth pads. You have to consider how sensitive the tissues exposed to the bleaching and sanitizing chemicals in disposable feminine products are. They are quite sensitive and may not tolerate all those chemicals very well.

That concludes my series on cloth pads! I hope that it has been informative and educational. If you have any questions please leave a comment and I will do my best to answer them. :)


Wednesday, April 12, 2017

A Word On Absorbency

{Buy My Cloth Pad Pattern HERE.}


I did an absorbency test with 2 samples of cotton flannel.

This test demonstrates the difference in absorbency between high quality flannel and low quality flannel.

I put 4 layers of flannel down on a piece of fleece and then I placed an average topper material over top.


Then I poured 2 tablespoons of water on the fabric. I let it set undisturbed for 1 minute to allow the water to soak in.

This is what I found on with the cheap cotton flannel:
The water soaked through all 4 layers.

This was cheap cotton flannel from a pair of Faded Glory brand (Walmart's generic) pajama pants.

This is how the high quality flannel preformed:
The water only soaked through 2 layers of the high quality flannel.

I used the same amount of water (it was the same temperature, too) and let it set for 1 minute, undisturbed.

The high quality flannel was from a JC Penney brand cotton flannel pillow case.

I could tell that the JC Penney flannel would be more absorbent just by feeling it. It was very thick and lush. The Faded Glory flannel was much thinner and lighter.

The cheap flannel can still be used to make good cloth pads. Knowing that it is less absorbent is very important, though, because you will have to use more layers to achieve the right absorbency. Or, you could do what I did, and combine some high quality flannel and low quality flannel and use them together in a pad.

Here is the general rule of thumb for how many layers to use:
(The smaller number would be for high quality flannel and the larger number would be for less absorbent flannel. )

1-2 layers of flannel = light absorbency
2-3 layers of flannel = medium absorbency
3-4 layers of flannel = heavy absorbency
4-5 layers of flannel = postpartum absorbency

These numbers are just a general rule of thumb. I recommend that you get to know the materials that you are working with and use your senses to determine how many layers of flannel you should use.


Another thing to keep in mind is that flannel's peak absorbency is reached after multiple washings and dryings. If you are using new flannel fabric it may not be as absorbent, yet, as flannel fabric that has been washed and dried countless times.

I want to also add, that you should not be using softener on your cloth pads or the material you will be making your cloth pads out of. Softener will make your fabrics less absorbent and possibly make them water repellent.

Monday, April 10, 2017

Installing Open Ring No-Sew Metal Snap Fasteners

There are 4 pieces to open ring metal snaps.
1 stud, 1 receiver,
And 2 toothed rings.

Place a toothed ring on the place where you want a snap, toothed side down.

Using a pencil eraser,

or, your fingers,...
poke all of the teeth through the fabric.

Place a receiver or a stud piece onto the teeth. Make sure the teeth are lined up with the corresponding groove in the stud piece or the receiver piece.

Place a spool over the receiver piece or the stud piece.
Give it 3-4 good whacks with a hammer. I recommend that you do this on your cutting board.
Double check, before installing the next snap, that the studs and receivers are pointing in a direction that will allow them to snap together correctly.


That is all there is to installing open ring metal snaps!

Friday, April 7, 2017

Up-cycled Cloth Pads {Part 3} Sewing Tutorial

{Buy My Cloth Pad Pattern HERE.}


To Cut Out The Pieces:

Take pattern piece B (the piece with the wings) and place it on the topper fabric you have chosen.


Place it so that it goes with the grain and covers a pretty section of fabric that will look good once it is cut out.

Pin it in place or use a pen, pencil, or marker to trace your pattern shape onto the fabric.

Cut piece B from your topper fabric.


Take pattern piece A (the piece without wings) and place it on your absorbent core material. Pin it in place or trace around the edges.


You will need to cut out several of these for each pad.
This is a rule of thumb for how many layers you need:
Terry Cloth-
1 layer = light absorbency
2 layers = medium absorbency
3 layers = heavy absorbency

Flannel-
2-3 layers = light absorbency
3-4 layers = medium absorbency
4-5 layers = heavy absorbency


To cut the back out, take piece B (the one with the wings), and position it on your backer material. Aligning it with the grain may be difficult when using up-cycled materials. Try to make it go with the grain as much as possible.


Pin or trace, and cut.

To Assemble:

Step 1.
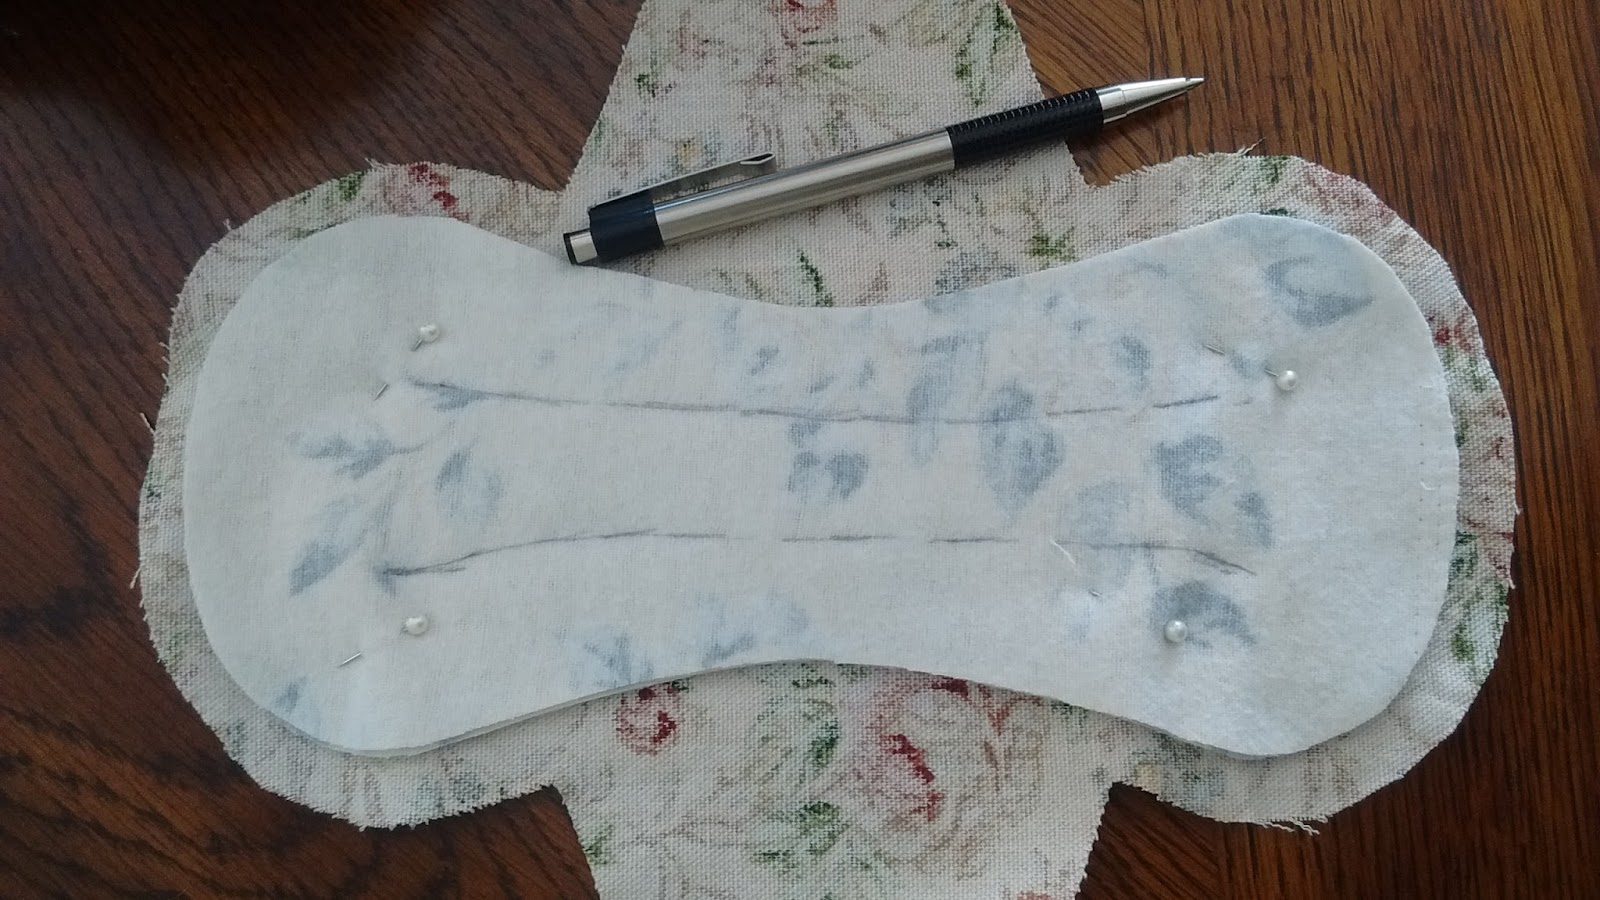
Align the absorbent cores on the WRONG side of the topper.

Pin in place.

Mark quilting lines on the core fabric.


Using a sewing machine stitch through all layers along quilting lines.

Stitch both lines in the same direction.

Backstitch at the beginning and end of each line of stitching to make sure the stitching stays permanent.

The layers will tend to shift so sew at a slow pace.

Step 2.
Place the top and back together, RIGHT sides together, matching wings and curves. Pin in place.


Mark an area on one wing to be the designated turning hole (as shown). This is where you will be turning the pad right side out.


Stitch topper and backer together using a 1/2 inch seam allowance, backstitching at the beginning and ending. Leave the designated turning hole UNstitched.

Step 3.
Trim seams to about 3/16 inch from stitching. Leave the designated turning hole untrimmed (as shown).


Clip corners (as shown).


Clip inside corner at the designated turning hole (as shown).


Step 4.
Turn the pad right side out through the designated turning hole. Work all of the layers, edges, and corners until they lie flat.


Step 5.
Hand stitch the designated turning hole closed using a slip stitch or running ladder stitch.

Step 6.
Topstitch 1/4 inch from the edge along the entire perimeter of the pad, backstitching where topstitching meets.


Step 7. (Finishing)
Mark placement for snaps on wings. Install fasteners.


Finished pad:


Wednesday, April 5, 2017

Up-cycled Cloth Pads {Part 2}: Pattern Making

{Buy My Cloth Pad Pattern HERE.}


How to make a cloth pad pattern.

A note on pattern paper: 
You can use almost any kind of paper to make your pattern out of. I have used newspaper, regular printing paper, and brown paper (old Aldi bags). I am sure cardstock would work well.

Method #1 Using A Disposable Pad


• Trace the shape of your disposable pad onto pattern paper. 

• Use a ruler to add 1/2 an inch around the border of the shape you have traced. This is the seam allowance.

• Cut along the outside line of the pattern shape.

• Cut the wings off of your disposable pad that you are using as a template.

• Trace the wingless pad onto a new piece of pattern paper.

• Cut out the wingless pad shape that you have just traced.

• You can now label the wingless pattern piece 'A' and the winged pattern piece 'B'.

Method #2 Using A Quarter Folded Paper


• Fold a piece of paper in half and then into quarters.


• Decided how long you want your pad: divide that number in half. Take that number and mark where it lands on the long, folded, edge of the quarter folded paper.

• Decide how wide you want your pad in the center: divide that number in half. Take that number and mark where it lands on the short, folded, edge of the quarter folded paper.

• Draw a curved line connecting the two points. (As seen in the picture)


• Cut on the line, through all the layers. Leave the cut out piece folded.


• Fold a second piece of paper into quarters.

• Lay the already cut pattern piece onto the new quarter folded paper, carefully lining up the folded corners.

• Trace the shape onto the new paper.

• Add a tab to the traced shape. As shown. This will be the wing.


• Using a ruler draw a line 1/2 inch from the original shape, including the wing. This is the seam allowance.

• Cut out the winged drawing, through all layers.

• You can label the wingless piece 'A' and the winged piece 'B'.


I carry my pattern in several sizes on my Etsy store, if you are interested you can click HERE.