Thursday, December 30, 2021

Sour Cream Coffee Cake Recipe!


This Coffee Cake is extra fancy! It serves a crowd and is the perfect treat for a Chruch function or Brunch Bridal Shower. We recently served it as a birthday cake for someone in our family.

I found this recipe in an American's Test Kitchen cook book. If that is not a sign of excellence, than I don't know what is! I am glad I discovered this recipe. This is the kind of recipe that I pull out for special occasions.

Sour Cream Coffee Cake Recipe

Serves 16

Streusel Ingredients:
3/4 cup Flour
3/4 cup Sugar
1/2 cup packed Dark Brown Sugar
2 TBS. Cinnamon
2 TBS. Butter, cold
1 cup Nuts (Pecan or Walnut), chopped

Cake Ingredients:
12 TBS. Butter, softened but still cool, cut into 1 inch cubes
+2 TBS. Butter for greasing the pan
4 Eggs
1 1/2 cups Sour Cream
1 TBS. Vanilla Flavoring
2 1/4 cups Flour
1 1/4 cups Sugar
1 TBS. Baking Powder
3/4 tsp. Baking Soda
3/4 tsp. Salt


Step 1. For The Top Streusel and Middle Streusel:
Combine the 3/4 cup flour, 3/4 cup Sugar, 1/4 dark brown sugar, and cinnamon in the workbowl of a food processor. 
Transfer 1 1/4 cups of this mixture to a small bowl; stir in the remaining 1/4 cup dark brown sugar and set aside (this will be the streusel for the inside of the cake).
Add the 2 TBS. butter and 1 cup Nuts to the remaining ingredients in the food processor bowl. Pulse the mixture until the nuts and butter have been broken down into small pebbly pieces. Set aside (this will be for the top of the cake).

Step 2. For The Cake
Adjust the oven rack to the bottom position and heat the oven to 350° F.


Grease a 10-inch tube pan with 2 TBS. Butter. If your tube pan has a removable bottom, wrap the outside portion of the bottom of the pan with aluminum foil.


Combine 4 eggs, 1 cup sour cream, and 1 TBS. Vanilla in a medium bowl. Mix thoroughly.


Place the 2 1/4 cups flour, 1 1/4 cup Sugar, 1 TBS. baking powder, 3/4 tsp. baking soda and 3/4 tsp. salt in the bowl of a stand mixer and mix on low speed for 30 seconds.
Add the 12 TBS. of soft, yet, cold butter and remaining 1/2 cup of sour cream and mix on low speed until the dry ingredients are moistened. Increase speed to medium and beat 30 seconds.
Scrape down the sides of the bowl. Decrease mixer speed to medium-low and slowly incorporate the egg mixture in three additions, beating 20 seconds after each addition and scraping the sides of the bowl as necessary.
Increase the speed to medium-high and beat for 1 minute (the batter should increase in volume and become aerated and pale in color).


Add 3 cups of batter to prepared pan. With a spatula, smooth the surface of the batter.
Sprinkle with 3/4 cup of streusel without nuts. Drop 1 cup of batter over the streusel, spread evenly, and then sprinkle over remaining filling streusel.
Top with remaining batter and smooth the cake with a spatula making the surface smooth. Evenly pour over the streusel with nuts.

Bake until the cake feels firm to the touch and a toothpick comes out clean, 50 to 60 minutes. If your tube pan has aluminum foil wrapped around the bottom on the outside it will take longer to bake, 70 to 80 minutes.
Cool the cake in the pan for 30 minutes. Place a rimmed baking sheet over the top of the cake and invert the cake onto the pan. Remove the tube pan, place a wire rack on top of the cake, and reinvert so the streusel is facing up.
Cool for 2 hours and serve, or cool completely and wrap cake in aluminum foil to serve later.
Enjoy!


Tuesday, December 28, 2021

Prize Winning Cranberry Almond Tea Ring


I say, "Prize Winning," because this Tea Ring won State Fair entry and Champion prize at the 4-H county fair more than once 

This Tea Ring delivers when it comes to presentation and flavor. It looks gorgeous and it tastes exquisite!


It does require a few special key ingredient; Cranberries, Almond Paste, and Slivered Almonds.


I always stock up on cranberries in the autumn when they are in season. Cranberries can be frozen very easily to be used at times when cranberries are not in season. Fresh or frozen cranberries work just as well as one another in this recipe.


This recipe is a little time consuming, but it is worth the investment! This recipe makes two, full size Tea Rings. They freeze nicely. If you don't need to serve both Tea Rings you can always freeze one of them for later.


Cranberry Almond Tea Ring

Bread Dough Ingredients:

1 cup Milk

1/2 cup Butter

1/3 cup Sugar

1/2 tsp. Salt

4 cups Flour

2 1/4 tsp. Yeast

2 Eggs + 2 Egg Yolks


Filling Ingredients:

2 cups Cranberry, Fresh or Frozen

1 pkg. (7oz.) Almond Paste

1/2 cup Butter, softened

1/2 cup Sugar

1 Egg

1/2 tsp. Almond Extract

1/2 cup Flour


Glaze Ingredients:

1 Egg + 1 TBS. Water

2 Tbs. Slivered Almonds

1 cup Powdered Sugar

1/8 tsp. Almond Extract

3 Tbs. Milk


Step 1. Make The Dough

Line two baking sheets with parchment paper. 

In pot over medium-low heat combine milk, butter, sugar, and salt; heat until butter melts. 

Remove from heat; cool until warm.

In bowl combine 2 1/2 cups flour with yeast; stir in milk mixture, 2 eggs and 2 egg yolks until smooth and combined. Stir in 1 1/2 cups flour until sticky dough forms. 

Turn dough out onto lightly floured surface; knead until smooth and elastic, kneading in additional flour (about 1/2 cup) to prevent sticking. Transfer dough to buttered bowl; turn to coat. Cover; let rise in warm place until doubled in bulk, 45 minutes.


Step 2. Make Filling:

In blender or food processor pulse cranberries, in batches if necessary, until coarsely chopped; set aside.

At medium speed beat butter (1/2 cup) and sugar (1/2 cup) until fluffy; 2 minutes. Add almond paste; beat until smooth. Beat in egg and almond extract until smooth. Add flour and beat until combined.


Step 3. Assembly

Punch down dough; turn out into lightly floured surface. Divide dough into 2 equal pieces. Cover and refrigerate 1 piece. 


Roll out dough into 17×11 inch rectangle. Spread half of almond paste mixture within 1/2 inch of edges; sprinkle with 1 cup of chopped cranberries. Brush long edges of dough with water. Starting with opposite long edge roll up dough jellyroll style. Pinch seam together to seal.

Cut two 1 inch wide pieces from each end of the roll; set aside. Shape roll with seam side down into ring on 1 baking sheet; press end together to seal. 


Using scissors or serrated knife, cut about 3/4 through outer edge every 1 inch all around ring. 


Twist each cut piece slightly to expose swirl inside roll. 


Cut reserved dough end in half to make 4 slices. Set 1 slice in center of ring; arrange remaining 3 cut side to over center slice. 

Cover, let rise until doubled in bulk, 45 minutes. 

Repeat with remaining dough to make second tea Ring.


Step. 4 Bake and Ice

Preheat oven to 359°F. 

Beat 1 egg with 1 TBS. water. Brush each ring with egg wash; sprinkle each with 1 TBS. almonds.

Bake 30-35 minutes or until golden. Cover edges with foil of browning too quickly. Cool on rack 10 minutes. Remove from pans. Mix powdered sugar, almond extract, and enough milk (start with 1 TBS.) to make pourable. Drizzle over each ring.


Thursday, December 23, 2021

Eggnog Recipe!


We have made this eggnog recipe twice in the past week. It is so good! So rich and creamy! And, not overly sweet. The only problem? It runs out too fast! :)

Eggnog Recipe

6 eggs

2 egg yolks

1/2 c. sugar

4 c. whole milk

1/4 t. salt

1/2 t. nutmeg

1 T. vanilla flavoring

1/2 c. whipping cream


In a heavy bottomed sauce pan whisk eggs and egg yolks until very smooth. Add sugar, whisk until smooth. While whisking, slowly add milk in a steady stream. Stir in salt and nutmeg. 

Over the lowest heat on your stovetop, heat the custard until 160° F. This will take 45 minutes to 1 hour. 

Pour custard through a strainer to filter out any cooked egg bits. Add vanilla flavoring. Place in refrigerator and chill 3 hours to overnight.

Before serving; whip cream and stir into eggnog. 

Serve with extra nutmeg sprinkled over each glass/mug.
Enjoy!

Tuesday, December 21, 2021

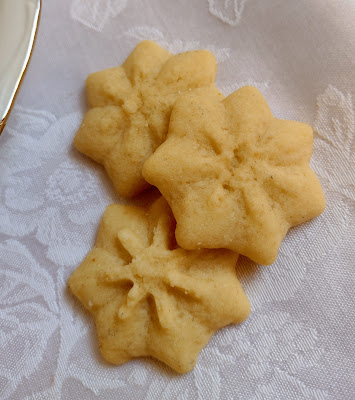
Spritz Butter Cookies With Wilson Cookie Press


Spritz Butter Cookies Recipe

1 1/2 cup Butter, softened
1 cup Sugar
1 Egg
2 TBS. Milk
1 tsp. Vanilla Extract
1/2 tsp. Almond Extract
3 1/2 cups Flour
1 tsp. Baking Powder

Preheat oven to 350° F.

In medium bowl, combine flour and baking powder.

In large bowl, beat butter and sugar with electric mixer until light and fluffy. Add egg, milk, and extracts. Add flour mixture; mix well.

Fill cookie press with dough and fit with desired plates; press cookies onto ungreased cookie sheets.

Bake 10-12 minutes or until edges are light golden brown. Cool 2 minutes on cookie sheet; remove to cooking rack and cool completely.

Makes about 7-8 dozen.

Tip: Do not refrigerate the dough before using the cookie press. The dough needs to be soft to squeeze through the press.


This cookie press is a great tool for making butter cookies. 

It is so easy to use: 

Load with batter.


Place in position.


Squeeze the trigger.


Lift.


Ta da!


It is also easy to change cookie shape plates.


Unscrew the collar. And remove the plate that you want to replace.


Select a new cookie shape plate. Put it into place with the correct side facing out, as indicated on the plate.


Screw the collar back on and load the press with more cookie dough.


I really like my cookie press. Mr. In the Mid-west bought in for me several years ago. 


I used to keep a container of these Spritz cookies on hand in the freezer back when I was a, "Cookie Jar Mama." I wrote a blog post about it at the time. You can read the post about that era HERE. Memories..... :)

Do you have a cookie press?

Do you like Spritz Butter Cookies?

Let me know in the comments section!

Tuesday, December 14, 2021

Chicken Tetrazzini Recipe!

My husband loves it when I serve Chicken Tetrazzini for supper!

The sauce is creamy. The sauted mushrooms add concentrated umami flavor. The subtle kick of nutmeg lends a sense of intrigue to the pallet. And, the splash of lemon juice provides just the right amount of acidity.


Chicken Tetrazzini

1 Onion, Diced

12-16oz. Fresh Mushrooms, Sliced

1 Stick (8 TBS.) Butter, Divided

1/2 Cup Flour

1 Quart(32oz.) Chicken Broth

1 1/2 tsp. Salt

1/4 tsp. Nutmeg

1/4 tsp. Pepper

Tiny Dash Cayenne Pepper

2 Cups Cooked Chicken, Chunked

1/2-3/4 Cup Strong Cheese (Parmesan, Sharp Cheddar, etc.)

1 TBS. Lemon Juice 

1 lb. Spaghetti Noodles, Cooked


In a heavy bottom dutch oven pot saute onion and mushrooms in 4 TBS. butter until soft and liquid reduced.


Remove mushrooms and onions to a bowl.


Melt remaining 4 TBS. butter in dutch oven and make a roux with the 1/2 cup of flour.


Add the broth and spices. Cook until simmering and slightly thickened.


Add cheese, chicken, lemon juice, and sauted mushrooms and onions. Stir until cheese melts. 


Pour sauce over pasta and stir to coat. 


Place into a casserole dish.


Bake at 350° F. for 30 minutes.


Enjoy!

Tuesday, December 7, 2021

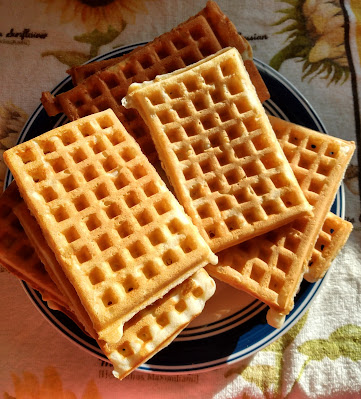
Waffle Recipe!

 I have been liking this waffle recipe lately. I am lazy about separating the eggs and whipping egg whites into stiff peaks for waffles. This recipe doesn't call for separating the eggs and the waffles turn out great, anyway.

I am, also, lazy about melting butter for batter. This recipe calls for vegetable oil, which is another reason that it is an easy recipe. I'm sure butter would taste better, but nobody at my house complains about the lack of butter.

I like the addition of vanilla extract in this waffle recipe. It is noticable and pleasant.

Easy Waffles

2 Eggs

2 cups Flour

1 3/4 cups Milk

1/2 cup Vegetable Oil

1 TBS. Sugar

4 tsp. Baking Powder

1/4 tsp. Salt

1/2 tsp. Vanilla Extract


Preheat waffle iron. Beat eggs in large bowl with whisk until foamy. Beat in flour, milk, vegetable oil, sugar, baking powder, salt and vanilla, just until smooth.


Spray preheated waffle iron with non-stick cooking spray. Pour mix onto hot waffle iron. Cook until golden brown. Serve hot.


Tuesday, November 30, 2021

Extra Banana-y Banana Bread

I added extra bananas into this batter.
This recipe was a hit with Mr. In The Mid-west. I am sharing it here so that I don't forget how I made the batter. Sometimes I make up recipes as I go and don't write down what I have done. If they turn out good I would like to replicate it in the future, but I often can't recall enough of the details, much to Mr. In The Mid-west's disappointment.

I like to use this batter to make bread or muffins. More often than not I make muffins. My children seem make less messes while eating muffins verses eating a slice of banana bread.


Banana Batter For Bread Or Muffins

1/2 cup Oil

1 cup Sugar

2 Eggs

1 tsp. Vanilla Flavoring

2 cups Flour

1/2 tsp. Baking Soda

1/2 tsp. Salt

1 tsp.  Baking Powder

1 1/2 cups Mashed Ripe Banana


Stir the oil and sugar together. Add the eggs and vanilla. Whisk vigorously until the mixture is a pale lemon color.


Dump the dry ingredients on top. Incorporate the baking soda, salt, and baking powder into the flour only, before incorporating it with the rest of the wet ingredients.


Add the mashed bananas and mix well.


Pour into greased muffin tins or greased loaf pan.


Bake at 350°F. 


Bake muffins 25-30 minutes.

Bake bread 60-70 minutes.


Enjoy!


Tuesday, November 23, 2021

Vintage Waffle Makers

Vintage waffle makers have a special appeal to me. My mom used a 1950's or 60's General Electric model all through out my childhood. In fact, she still uses it. The family out grew one waffle maker and, fortunately, she was able to pick up another General Electric waffle maker of the same model. Now she uses both waffle makers to cook enough waffles to feed everyone.

We were gifted a modern waffle maker as a wedding present. It worked well for four years before it conked out, which was very nice. But, it did not stand up to anywhere near the amount of time or use that my Mom's vintage waffle makers have.

I was excited when I recently acquired three vintage waffle makers. There is a thrift store in our area that has turned out to be a good place to look for vintage waffle makers.

My family is not big enough to require three waffle makers to feed everyone. And, I have no intention of starting a vintage waffle maker collection. (The more I learn about these old appliances, though, the more I am tempted.....)

I made a plan to try them all out and keep the one that I liked the best.
As I expected, the first couple batches stuck badly to the waffle griddles. What a pain!

The oldest waffle maker that I tested was the Fostoria by McGraw Electric Co. 

I fell into a deep internet rabbit hole reading all I could about the McGraw Electric Company. The long and short of it is, that a fascinating gentleman, Max McGraw, started his electric company in 1900 when he was only 17. He had good business sense. He was able to expanded his company in many directions. In 1948 he bought the Fostoria brand. The waffle maker I have was manufactured between 1953 and 1957.
The waffle griddles are made from cast aluminum. They are not coated with any non-stick finishes. The griddles become seasoned with use and end up behaving like a they have a non-stick surface. Just like cast iron does once it has been seasoned.

The Fostoria waffle maker is not temperature regulated. It does have a temperature indicator. To keep it at the right temperature for baking waffles you have to manually regulate the temperature by unplugging the appliance when it starts to get too hot and plugging it back in when it starts to get cool. I didn't have any trouble keeping it at the right temperature.
The Fostoria waffle maker is the only one with a fabric covered cord 
Further reading:


The newest waffle maker I tested was a General Electric model A2G48T. I don't know when it was made. One indicator of it being a newer appliance is the heating elements. They are not the coiled spring heating elements of earlier times.

The A2G48T made the regular style waffles with small dimples and not the larger hole Belgium style waffles.


This waffle maker has a very shiny chrome finish.

I saved the best for last........
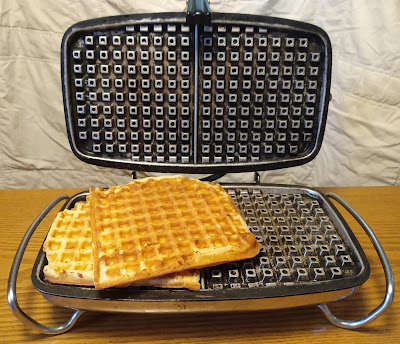
This Sunbeam no. WB-K is the winner in my kitchen!

The waffles are rectangular. They come out nice and crispy on the edges. They have American style dimples. The waffle maker is hefty and well built. It heats up quickly and the temperature is self regulated. 

It looked brand new when I bought it. I hope it lasts for many, many years. I believe this waffle maker was built at a time when durability was one of the main objectives.


The griddles are reversible and the waffle maker can be converted into a smooth griddle for cooking eggs or pancakes.

As near as I can tell the Sunbeam WB-K was made in the 1960's. 

If you are in need of a waffle maker, I advise looking for a vintage Waffle Maker. You may be able to find one at a thrift store, flea market, or estate sale. Online sites like eBay and Etsy have several listings for vintage Waffle Makers. These old waffle makers stand up to a lot of use. Consider that you will probably get your money's worth when you buy an older appliance like these.

Do you like vintage waffle makers?
Are you a fan of Belgium style dimples or American style dimples in your waffles?
Tell me any waffle stories that you have, in the comment section. I'd love to read them!


Tuesday, November 16, 2021

Chicken And Dumplings


I am sharing the dumpling recipe that serves our family perfectly, at this time. Dumplings are always best the first time they are served. I try not to make extras because they are not our favorite reheated as leftovers. 


I am not including the chicken soup part of the recipe. Make a basic chicken soup with  your choice of vegetables and seasoned as you like. Once the soup is made and has reached a simmer the dumplings come into play. Whip up a batch of the dumpling dough and cook them on the surface of your simmering soup.

This is a very comforting meal on cool nights. Especially at this time of year!

Herbed Dumpling Recipe

1 1/2 cups Flour

1 tsp. Salt

1/4 tsp. Dried Thyme

1/4 tsp. Dried Parsley

2 tsp. Baking Powder

3 TBS. Cold Butter

2/3 cup Milk

Mix together dry ingredients.

Cut in butter with a pastry blender or grate in butter with a grater.

Stir in the milk.

Drop by spoonfuls onto the surface of the soup.

Cover pot with lid and simmer for 15 minutes.


Serves 4