Showing posts with label Try Something New. Show all posts

Tuesday, December 10, 2024

Natto Making Experiment

This post is *not* a tutorial. I just want to document my first attempt at natto making. Making natto was an adventure and I made many mistakes along the way.

I have wanted to try making natto since I watched Emmy do it on her YouTube channel.

I started by soaking the soy beans for 24 hours. I heard that this small foam that develops on the water surface is an indicator that the beans have soaked long enough.

I drained the beans.


I cooked them in my electric pressure cooker for 25 minutes under pressure.
I put the hot soy beans into a couple ceramic vessels that I had sanitized with bleach. 
This is when I started to make mistakes. I realized that every example online only used shallow dishes to ferment natto. I had counted on using a deep container to ferment a whole bunch at one time. I had to alter my plans and use only a shallow layer of beans in my containers.
Boy, did I have a lot of extra soy beans!

To inoculate my soy beans with the right culture I put a chunk of frozen commercially prepared natto in the center of the hot beans.
After a few minutes it was totally thawed and I stirred it around thoroughly to get culture on all the beans.
I used a piece of plastic from an old cereal bag, which I had also sanitized, to seal in the moisture. I poked a few holes for breathing and left my thermometer through one of the holes to monitor the temperature.

Here I ran into another problem. I had counted on using the electric pressure cooker to keep my fermenting beans at the right temperature just like the lady in the video had done. The problem is that my electric pressure cooker is not an Insta-pot brand and it does not have a yogurt setting, which had not noticed until I was ready to ferment my beans.

After ample googling and blog reading I came to the conclusion that I would try my crockpot on the keep warm setting. I believe that the keep warm setting is still too hot. (Natto ferments at 90°-113° F.) I planned to turn it on for a while and then turn it off for a little bit and so on and so forth through the night. 

I fell asleep and left it on for too long, or so I thought. And then it got too cold one time, or so I thought.
I wasn't too optimistic when the fermentation time was over. I checked to see if the beans had the strings to prove that they had turned into natto.

We had strings! Somehow it had worked!
We eat our natto on top of a serving of rice with sardines or boiled eggs. 

I like to garnish with pickled onions or peppers or green onions. And always a sprinkle of soy sauce.


I eat my bites on little pieces of nori when we have some. Very tasty and very nutritious.


Monday, September 18, 2023

Bruschetta French Toast, Really?!


I know it sounds crazy, but it is delicious!

1 large loaf of Asiago Cheese Bread
3 Eggs, beaten
3/4 cup Milk
8 oz. Mozzarella, shredded 
2 Roma Tomatoes
1/4 c. fresh Basil Leaves
1 clove Garlic

Cut the loaf of bread into 9 slices.

In a bowl beat together eggs and milk.

Dip the bread into the milk mixture quickly passing it through to coat, but not soak.

In a hot greased skillet cook the "French toast," turning when brown. Sprink cheese on the toast after it is cooked on one side.

Make the bruschetta by dicing the tomatoes, mincing the garlic and basil, and mixing all together.


Top each "French toast" with bruschetta mixture and serve.
Enjoy!


This was so tasty! The Asiago cheese bread really makes this recipe pop. I'm not even sure where you buy this type of bread. I have been given a few loaves. They are large, round loaves with a strong cheese flavor.

Tuesday, February 15, 2022

Green Lentil Dahl Recipe


I feel so adventurous! This is way out of my normal cuisine range.

I really like this recipe! I have yet to try it with the red chilis added, but I would like to in the summer when chilis are in season.

This recipe comes from Slow The Cook Down. Check out the original recipe HERE. I have cut it in half and it is still plenty for our size family. I swapped out the red onion for a regular onion, too. I like to buy my spices from my local Indian grocer. (I wrote I blog post about it. Check it out HERE!) The Indian grocery store has great prices and selection when it comes to spices!

Green Lentil Dahl

Ingredients


  • 2 cups green lentils
  • 1 tbsp olive oil
  • tbsp mustard seeds
  • 3/4 tsp turmeric
  • 1/2 tbsp ground cumin
  • 3/4 tsp mild curry powder
  • bay leave
  • 1 onion diced
  • inches ginger minced
  • 2 cloves garlic mince
  • red chilis minced
  • 13 fl. oz coconut milk (1 cans) 
  • 1/2 cup water 
  • juice of one lime
  • salt and pepper

Instructions

  • Place the lentils in a large bowl of water and set to one side.  Chop the ingredients and get your spices ready!
  • Heat the oil in large pot over a medium heat. Once hot, add the mustard seeds.
  • When the mustard seeds start to pop, add in the turmeric, cumin, curry powder and bay leaves. Stir for a couple of minutes until the spices become fragrant.
  • Add in the onion, ginger, garlic and chili.  Stir so that the spice coats the onions and cook for 5 minutes until the onions start to soften.
  • Drain the lentils, and add in to the pot.  Add the coconut milk, lime juice and water and mix well.  Pop a lid on for 15 minutes
  • After 15 minutes, take the lid off and give a good stir, at this point you can add any added vegetables that you wish.  Cook the dish for another 10 or so minutes until excess liquid has cooked off
  • At this point, you could stir in some spinach or herbs - parsley and coriander work really well!
  • Serve with rice
  • Enjoy!

Tuesday, May 4, 2021

Lumpia Recipe

Our Pastor has raved about Lumpia after he has come home from different trips to the Philippines. He said they are like egg rolls and they are served with a delicious, sweet, chili sauce. 

I decided to give Lumpia a try. I looked online for recipes. I came across this one by Philip Lemoine, a man in Hawaii who's Mom came from the Philippines.

The thing that sold me on this recipe was this note at the bottom of the ingredient quantities, 

"This is PLENTY of garlic and you do not need to double this like we all do when we see garlic in a recipe."

Yes! "We" always double garlic in recipes! :)

 And with that feeling of camaraderie I purchased the ingredients and made a jumbo batch of Lumpia.


In the video recipe he mentions the special sweet chili sauce. I found the same brand of sweet chili sauce at the Chinese Grocery Store. Our Pastor confirmed that the Mae Ploy sauce was the same brand that he had been served while he was in the Philippines.


Lumpia Recipe 

2 lbs. Ground Pork
2 lbs. 80/20 Ground Beef
2 eggs 
4 oz. Soy Sauce
10 oz. Minced Carrots
16 oz. Minced Onions
3.5 oz. Minced Garlic
1 TBS. Black Pepper
Salt to taste (1 1/2 tsp.)
80 to 100 Lumpia Wrappers, Thawed
Egg Wash

Mince the vegetables in a food processor. 
Combine all the ingredients, (except for the Lumpia Wrappers and Egg Wash),  in a large bowl.
Mix thoroughly with your hands.
Peel apart all the Lumpia Wrappers and put in a plastic bag to keep from drying out.
Use a 1 oz. ice cream or cookie scoop to portion the filling for each wrapper.
To wrap Lumpia:
Place a wrapper in front of you on a diagonal. Put a scoop of filling slightly off center on the wrapper.

Fold the bottom corner, snuggly, up over the filling.

Fold both of the side corners toward the center.

Dip your finger into the Egg Wash and "paint" it onto the top flap.

Roll the Lumpia up.


Place the Lumpia on sheet pan and freeze over night.
Remove from sheet pan and place in plastic bag for storage. 
To fry:
Heat 3-4 inches of frying oil to 375° F. 
Put frozen Lumpia into hot oil. Do not over crowd the pan. 
Fry until golden brown, 6-8 minutes.
Serve with Mae Ploy Sweet Chili Sauce.

Tuesday, April 13, 2021

Visit To The Indian Grocery Store!


We have discovered an Indian Grocery Store close by to where we live. The Tikka Masala Recipe is the reason I had originally looked for an Indian Grocery Store in our area. I needed Garam Masala, a spice blend that I could not find at a typical grocery store.

There are so many interesting things at the Indian Grocery Store. Most of which, I have never seen before, and have no idea how to use or cook. I need someone to help me get started.

That "Someone," so far, has been the Owner of the store. Mr. In the Mid-west started up a conversation with the Owner one day when we were in his store. Once he heard that I eat gluten free he was showing us all around the store to many kinds of non wheat flours and products that are used in traditional Indian cooking. 


We bought a bucket of Dosa batter from the refrigerated section. The Owner Gentleman said it was for making pancakes. I read up on how to cook Dosa on the internet once we were at home. 

Dosa batter is a thin, fermented batter made from rice and lentils. You make pancakes out of it much in the same way you would cook a crepe. The batter bubbles up, kind of like a foam, once it hits the hot skillet. You use the back of a ladle to spread the batter in a circular motion starting in the center and spiraling out to the edge.

 The flavor is very much like real sourdough. I enjoyed the Dosa very much and so did our boys. You have to really like sourdough flavor to think that Dosa tastes good. Mr. in the Mid-west was not a big fan. :)


Their spice section is amazing at the Indian Grocery store! None of the prices were marked. I was very surprised at the checkout counter with how cheap the spices were ringing up. All the spices in the picture above cost about $12! That is nearly 50¢ per ounce. Compare that price to this little tin of Ground Ginger from Kroger: it cost over $3.00 for 1.5 ounces.


Not only are the prices of spices low at the Indian Grocery store, they have a huge selection! 


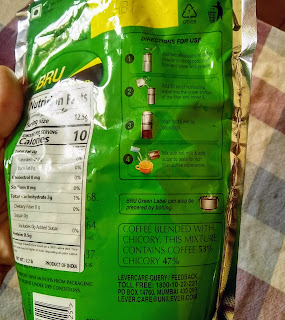
Another neat thing we have tried from the Indian Grocery store is coffee. The Owner Gentleman spoke with Mr. In the Mid-west about a few different coffee varieties. Some of the coffee selections were blended with chicory root. We picked out one that is 53% coffee and 47% chicory. 

Reading the brewing directions on the back of the package make me think that this coffee is used kind of like espresso. 

For one serving it calls for about 1/4 cup (50ml.)  of boiling water and 2 tsp. of coffee grounds. The coffee grounds are to be steeped 15 minutes and then strained and drank with milk. 

I don't have a French press to properly strain the coffee. But I do have a fine mesh tea strainer that has been working well. 

I heat some milk and foam it with a whisk before adding the coffee to the mug. I put about half and half, coffee to foamed milk.


I generally think coffee is nasty, but this kind of coffee is a real treat! With it being half warm, foamed milk it is not very strong. I can enjoy coffee fixed like this. :)

Do any of you know anything about Indian food? I am going to be learning all that I can.

If I find any good recipes I will share them here on my blog with you all!

Tuesday, February 9, 2021

Try Something New: Japanese Onigiri

Onigiri are eaten in Japan as sandwiches are eaten in The United States. They are easily portable. Onigiri are a great lunch food. 

I learned about Onigiri from the YouTube channel Emmymade. I recommend you search, "Emmymade Onigiri," on YouTube if you want to learn more about Onigiri. There are a lot of details in her videos that I found interesting. 

Onigiri is basically a seasoned rice ball, stuffed with tuna or other ingredients or left unstuffed, and wrapped in Nori (seaweed paper). I really like them. They are great and they are gluten free.

I am so happy that I tried Onigiri. They are really tasty! The seaweed wrapper, Nori, has a very unique flavor that I can't compare to anything that is in my normal American diet. I would describe Nori as tasting like the sea. Both of my boys really like it! They would eat a whole package in one sitting without adding anything if I let them. My youngest son described Nori like this, "It tastes like fish food!" (And he should know,.....) Haha!


I had to go shopping at the local Asian grocery store to buy some of the ingredients for Onigiri. 

This is the isle with Furikake seasoning.

I needed Furikake (rice seasoning). There are a lot of varieties of Furikake. I chose a Kimchi flavored Furikake. I thought is was very tasty. There was a nice kick of horseradish and flakes of Nori, plus sesame seed, anchovy, and other flavors. 


I bought a 50 lb. bag of rice at the Asian grocery store, too. The type of rice that works best for Onigiri is short grained rice, commonly called sushi rice. Short grained rice is very sticky and is sometimes called glutenous rice because it is sticky like glue, not because it contains gluten.
This is a package of small rectangle sheets
of dried seaweed. The larger squares of Nori
are the kind used for sushi. 


I also bought the Nori (seaweed wrapper) at the Asian grocery store. I have seen Nori for sale at some Walmart stores, though, so, if you don't have an Asian grocery store, you may be able to buy some Nori at Walmart. Walmart also carries sticky rice in the Asian section. I buy the Botan brand. At the Asia  grocery store they also carry Botan brown short grained rice, which is probably healthier for you. I haven't tried it yet, though.

 To make Onigiri:
1. Cook the rice according to the package directions.

2. Mix in some Furikake, if you want. This step is optional. I have made Onigiri without Furikake and it tastes fine.

3. Using wet hands, take a hand-full of rice and shape it into a ball.

4. If you are stuffing your Onigiri: Make a dimple in the center of the ball. Put a small spoonful of filling into the dimple. Roll the edges over to cover the filling. (Make sure to keep your hands wet, otherwise, this will be nearly impossible.) I have used tuna mixed with a little mayonnaise for stuffing my Onigiri. 

5. Wrap your rice ball in a sheet of Nori right before you are ready to eat. The Nori will quickly go soggy so don't do this step ahead of time. 

The pictures of Onigiri in this post show a small piece of Nori around the bottom side of the Onigiri. I was running out of Nori so I cut it into smaller pieces. I like to wrap the whole rice ball in a large sheet of Nori if I have enough to do so. But, you can wrap your Onigiri however you like! 

Have you ever tried making some food from a foreign nation? Did you like it? Let me know about your food adventures in the comments section!


Onigiri with some sad looking broccoli
 and carrots. :)


Tuesday, September 29, 2020

Paw Paw Fruit!


Our Paw Paw harvest.
 

Paw Paw trees are native to North America. I have gathered from what I have read that they grow from New York to the Great Plains and as far South as Tennessee. Fun fact: Paw Paw's are the largest, tree fruit, native to the North American continent.

Paw Paw grove.


Paw Paw trees are not very large trees. They grow in the understory of forested areas. They grow in groves, from what I have seen. They are always grouped together.

Paw Paw leaves.


The Paw Paw tree has large leaves. They are similar in shape to Hickory tree leaves. The way to tell them apart is that Paw Paw leaves are smooth around the edges and Hickory leaves have a fine tooth, serrated edge.

Paw Paw fruit growing on a tree in July.


Paw Paw trees have to be 7 or 8 years old to bear fruit. Paw Paw trees have not been grown commercially because the fruits are too perishable to survive shipping. They are ripe for 2 or 3 days and past that point they spoil. The best way to preserve the fruit is to freeze the pulp.


I have only had the pleasure of tasting Paw Paw Fruit once, before this year. It was back when I was a teenager. This year I found a Paw Paw grove at a park close to where we live. I was very excited to be able to try Paw Paw's again! Paw Paw's ripen from August to September. Last week we went to gather some fruit.


Paw Paw's smell very tropical. Very similar to a fresh, ripe pineapple. The skin is green. Inside, the flesh is bright yellow. There are several large, bean shaped, seeds. The flesh is soft and scoop-able. The taste is quite sweet and a little bit like a mango and an American Persimmon.


I wanted to use our Paw Paw's in a recipe so I did some searching online. I tried this recipe for Paw Paw Ice Cream. The results were great. The Paw Paw flavor came through bright and clear.


Paw Paw Ice Cream

1 1/2 cups of Paw Paw fruit puree

2 cups milk

2 cups cream

1 scant cup sugar

5 egg yolks

1 1/2 tsp. Vanilla extract


In a sauce pan heat milk, cream, and sugar until it starts to steam. Temper the egg yolks with the hot cream. Pour tempered eggs into the sauce pan and heat until slightly thickened. Remove from heat. Add Paw Paw puree and vanilla extract. Chill and then freeze in ice cream maker. I didn't have an ice cream maker so I just put it in a bowl in the freezer and took in out to mix every 30 minutes, or there about, until in was frozen to the right consistency.


Have you heard of Paw Paw's before? Have you ever tried them? Let me known in the comment section!

Tuesday, September 8, 2020

Try Something New


Genesis 1:29 And God said, Behold, I have given you every herb bearing seed, which is upon the face of all the earth, and every tree, in the which is the fruit of a tree yielding seed; to you it shall be for meat.


Today, we tried something new, at least new to us. Can you guess what it was?


Red potatoes? ...........

Nope.


Some kind of beet?............

Nope!

They tasted a little bit like a red raspberry, and the texture reminded me of a kiwi.


They have a lot of very hard seeds that are about half the size of a grain of rice. Thankfully the seeds are edible. It would be very difficult to spit them out because they are attached to the flesh and, also, because there are so many, many, seeds.

Okay, here is the last clue: they grow in the desert.

Did you get it?

We tried Prickly Pear cactus fruits! 

I was shopping at Walmart and happened to see Cactus Pears in the produce area. The price wasn't high. I thought they would be fun to try. And they were! That was pretty adventurous of me, seeing as how the last time I felt adventurous was last week and it didn't turn out so good. Last week I thought it might be fun to try a Papaya. Well, it wasn't. The Papaya flesh looked so yummy, kind of like a cantaloupe, but it tasted like a mushy, squash. It was a real let down. 

I am glad the Prickly Pear story has a better ending! We all liked them pretty well!

And, like most fruits, they are pretty good for you, too. I read that they are anti-inflammatory and high in some key nutrients. 

Have you tried Prickly Pear Fruits? What did you think? Were they good or not so much?


Tuesday, April 7, 2020

Carrot Jam; Layer Cake Filling

This post is for documentation purposes. I was "winging it" when I made this jam. If you are interested in a recipe for Carrot Jam, I will share the one I found and I used for inspiration. You can check that recipe out HERE.

After making Carrot Food Coloring For Icing.......


I had a bunch of grated carrot that I had squeezed a 1/3 cup of juice out of.

I added a 1/3 cup of water back to the grated carrots and put them into a sauce pan. I cooked them; steaming the carrots with the lid on the pot, for about 10 minutes, until the carrot pieces were soft and tender.

I placed the cooked, grated carrots into a blender, reserving about 1/2 cup. I thought that leaving some carrots un-blended would add some texture to the final product that would be pleasant.


I pushed the blended carrots through a mesh sieve. Why? I don't know. It seemed like the professional thing to do. I did want the jam to have some texture, so I probably didn't have to do this step.


I added the 1/2 cup of reserved grated carrots and 1 cup of sugar. I cooked the carrot mixture over medium/high heat until it started boiling, stirring as little as possible. Once it was boiling really good I cooked it for about 10 minutes, if my memory serves me correctly.


I allowed the jam to cool 10 minutes and then added 1 tablespoon of bottled lemon juice and 2 drops of lemon essential oil. I would have liked to add some lemon zest instead of essential oil, but I didn't have a fresh lemon. If I make carrot jam again I would add more lemon juice. I feel like my jam was lacking some acid. Carrots don't have any tanginess and most fruits that jams are made out of have a good amount of tanginess.


I used the carrot jam for the filling in a birthday cake. Everyone seemed to enjoy the carrot jam. Because of the color my mom expected the filling to be apricot. 


Carrot jam could be a little confusing on the taste buds, but it does make a very pleasant spread. I ate the leftover jam on oatmeal and liked it that way, too.